Angular 15: Calling the REST API with RxJS CombineLatest
This article is an extension of my previous article. In the previous article, we have seen how to make parallel HTTP calls with RxJS forkJoin() method. In this article, we will use the combineLatest() operator of the RXJS. We use the combineLatest() operator when we need to call multiple APIs and combine them for some processing before returning the result. The best use of this operator is when you have multiple, long-lived observables that rely on each other for some calculation or determination. The use case is that the Angular application wants to access product information of different categories from various REST APIs but the Angular Application wants to show all products of received categories on UI by combining them. Figure 1 explains the use case.
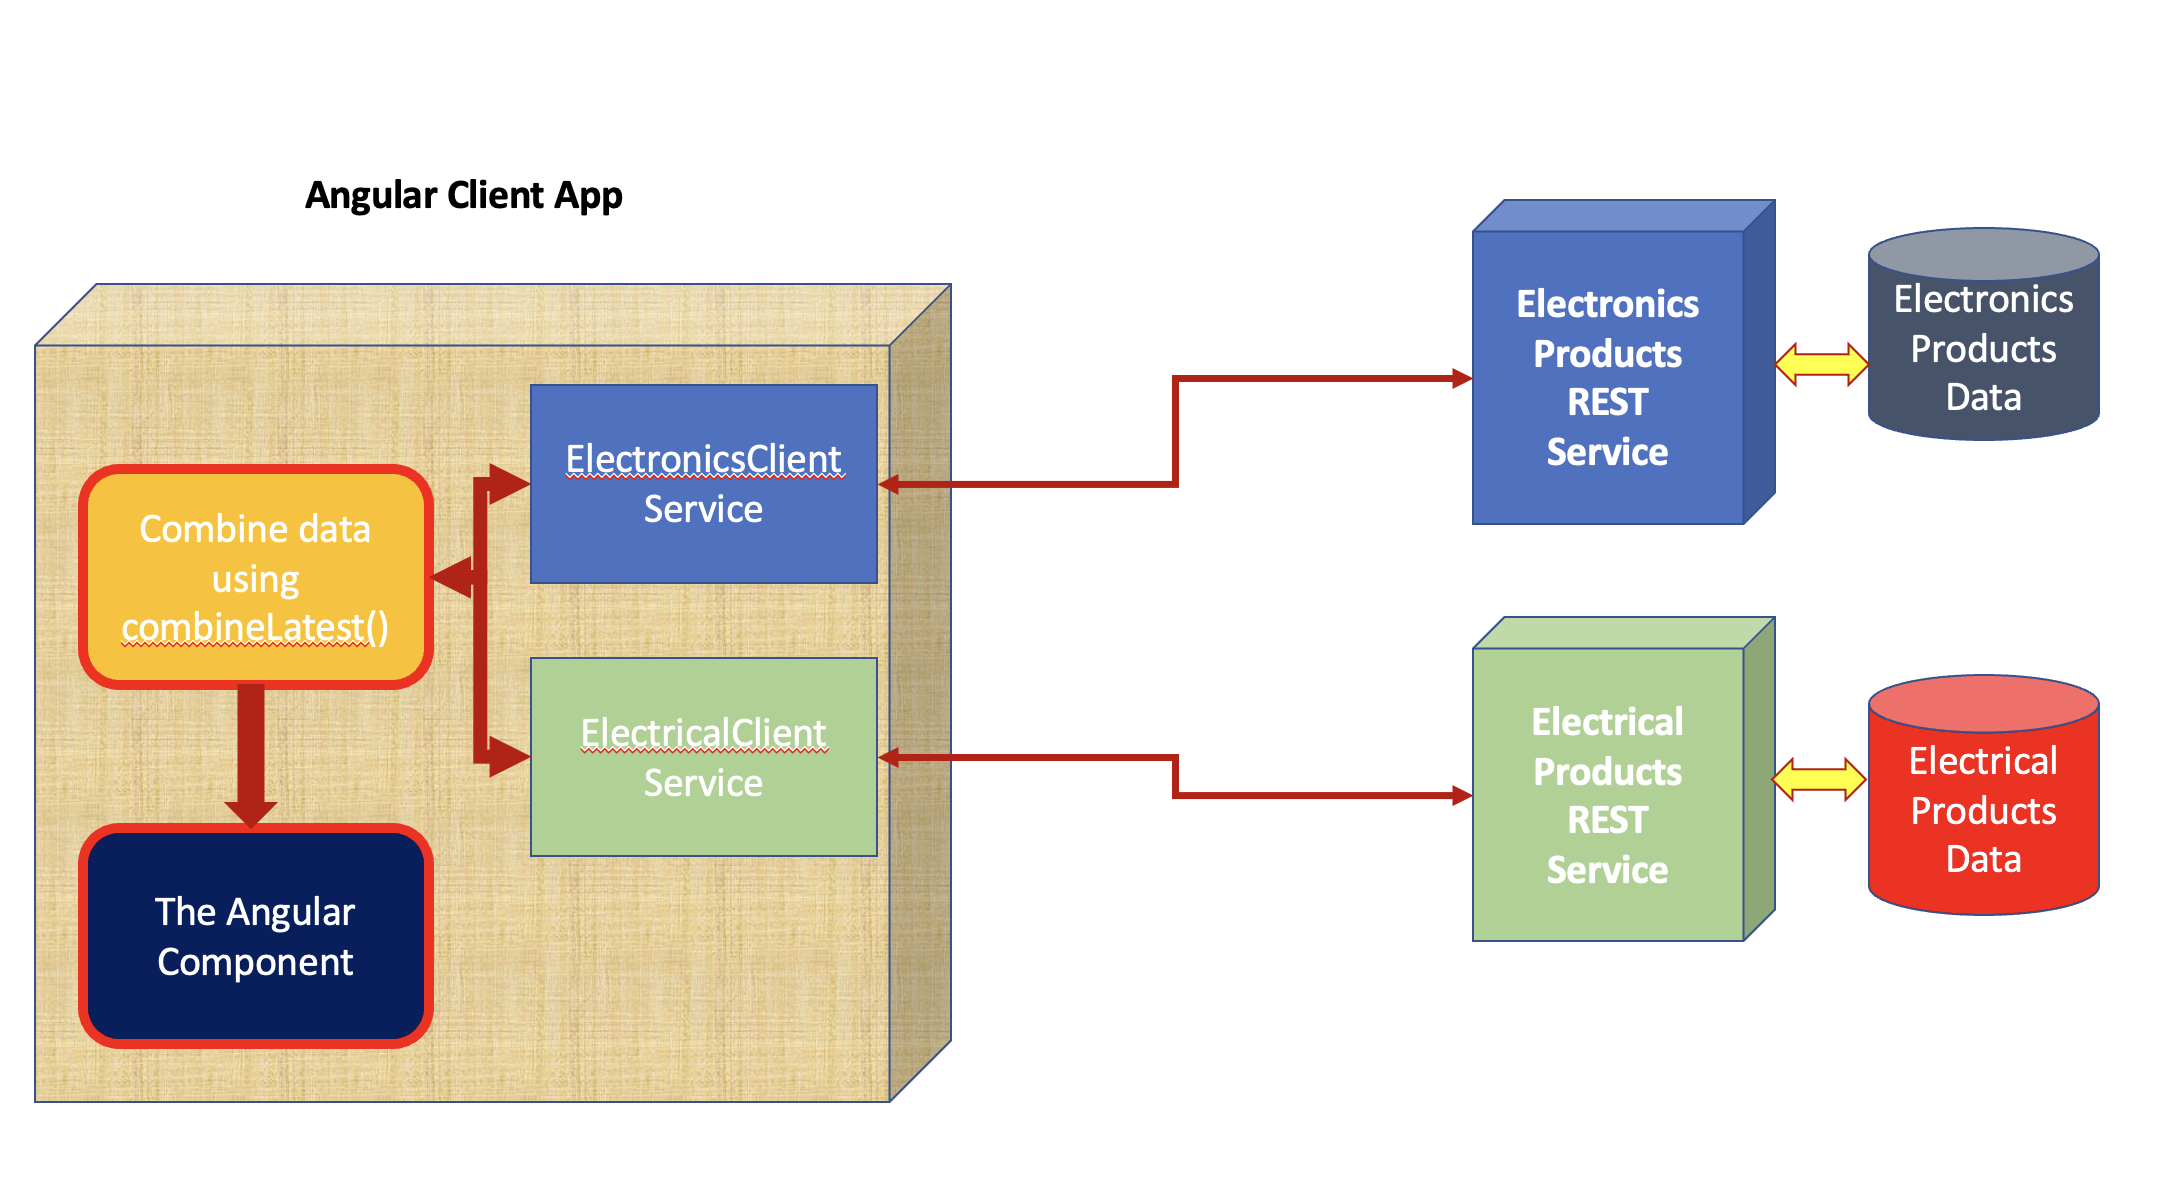
Figure 1: Using the combineLatest
The combineLatest() operator accepts Observables by accessing REST APIs, and then further allows us to add the code to process these observables as per our requirements in the Angular client application. One important feature of the combineLatest() is that it will not emit an initial value until each observable passed to it emits at least one value.
The Implementation
The code for this article is added in the same application, which I created for the previous article for forkJoin(). I have also provided the GitHub link for the code.
Step 1: In the server folder, add a new JavaScript file and name it electronicsservice.js. In this file, we will add the code for creating REST API using Express.js. The code is shown in Listing 1
import express from 'express';
import cors from 'cors';


const ElectronicsProducts = [
  {ProductId:1001,ProductName:'Laptop', Price:450000},
  {ProductId:1002,ProductName:'Desktop', Price:23000},
  {ProductId:1003,ProductName:'RAM', Price:4300},
  {ProductId:1004,ProductName:'DVD Writer', Price:2300},
  {ProductId:1005,ProductName:'Tablet', Price:34000},
  {ProductId:1006,ProductName:'Monitor', Price:8000},
  {ProductId:1007,ProductName:'Mouse', Price:500},
  {ProductId:1008,ProductName:'Keyboard', Price:1300},
  {ProductId:1009,ProductName:'Adapter', Price:4600},
  {ProductId:1010,ProductName:'USB', Price:300}
];

const PORT =  process.env.PORT || 8011;
// create an instance
const instance = express();
// Add JSON Middleware in HTTP Pipeline
instance.use(express.json());
// do not parse incoming data other than HTTP Request Message Body
instance.use(express.urlencoded({extended:false}));
// configure CORS
instance.use(cors({
    origin: "*",
    methods: "*",
    allowedHeaders: "*"
}));

instance.get('/api/products/electronics', (req,resp)=>{
   resp.status(200).send(ElectronicsProducts);
});

instance.listen(PORT, ()=>{
  console.log(`Electronics Products Service Started on Port ${PORT}`);
});
Listing 1: The electronicsservice.js
Similarly, in the services folder, add a new JavaScript file and name it electricalservice.js to REST API. The code for this service is shown in Listing 2
import express from 'express';
import cors from 'cors';


const ElectricalProducts = [
  {ProductId:2001,ProductName:'Bulb', Price:45},
  {ProductId:2002,ProductName:'Mixer', Price:3000},
  {ProductId:2003,ProductName:'Socket Extension', Price:300},
  {ProductId:2004,ProductName:'Wire', Price:200},
  {ProductId:2005,ProductName:'Power Connector', Price:400},
  {ProductId:2006,ProductName:'Iron', Price:3000},
  {ProductId:2007,ProductName:'Roter', Price:500},
  {ProductId:2008,ProductName:'Lamp', Price:900},
  {ProductId:2009,ProductName:'LED Bulb', Price:600},
  {ProductId:2010,ProductName:'Tube', Price:300}
];

const PORT =  process.env.PORT || 8012;
// create an instance
const instance = express();
// Add JSON Middleware in HTTP Pipeline
instance.use(express.json());
// do not parse incoming data other than HTTP Request Message Body
instance.use(express.urlencoded({extended:false}));
// configure CORS
instance.use(cors({
    origin: "*",
    methods: "*",
    allowedHeaders: "*"
}));

instance.get('/api/products/electrical', (req,resp)=>{
   resp.status(200).send(ElectricalProducts);
});

instance.listen(PORT, ()=>{
  console.log(`Electronics Products Service Started on Port ${PORT}`);
});
Listing 2: The electricalservice.js
Both of the above services are returning the product information for Electronics and Electrical products.
Step 2: In the models folder, add a new JavaScript file and name it product.js. In this file, we will add code for the Product class. This class will be used by the Angular application to store data received from API calls. Listing 3 shows the cod of the Product class
export class Product {
  constructor(
    public ProductId:number,
    public ProductName: string,
    public Price:string
  ){}
}
Listing 3: Product class
Step 3: In the service folder, we will create Angular services. These services will call REST APIs created in Step 1. In this folder, add a new JavaScript file and name it electronicsclientservice.js. In this file add the code for ElectronicsClientService as shown in Listing 4
import { Injectable } from '@angular/core';
import { HttpClient } from '@angular/common/http';
import {Product} from './../models/product';
import { map, Observable } from 'rxjs';

@Injectable({providedIn: 'root'})
export class ElectronicsClientService {

  private url:string ='http://localhost:8011/api/products/electronics';
  constructor(private httpClient: HttpClient) { }

  get():Observable<Product[]>{
    const resp = this.httpClient.get<Product[]>(this.url);
    return resp.pipe(map(result=>result));
  }
}
Listing 4: The ElectronicsClientService
Lets' add a new JavaScript file named electicalclientservice.js to add the code to access the ElectricalService REST API. The code is shown in Listing 5
import { Injectable } from '@angular/core';
import { HttpClient } from '@angular/common/http';
import {Product} from './../models/product';
import { map, Observable } from 'rxjs';

@Injectable({providedIn: 'root'})
export class ElectricalClientService {

  private url:string ='http://localhost:8012/api/products/electrical';
  constructor(private httpClient: HttpClient) { }

  get():Observable<Product[]>{
    const resp = this.httpClient.get<Product[]>(this.url);
    return resp.pipe(map(result=>result));
  }
}
Listing 5: The ElectricalClientService
Step 4: In the app folder, add a new Angular component, and name the file app.combineproducts.component.ts. In this file, we will add the code for CombineProductsComponent. In this component, we will make a call to get the () method of ElectronicsClientService and ElectricalClientService Angular services using combineLatest() operator. This operator will receive Observables from the service calls and then process them so that data from Observables can be combined into the productsList array. The subscribe() method reads the process data and then assigns it to the products array. The code for the component is shown in Listing 6
import { Component, OnInit } from '@angular/core';
import { combineLatest,map } from 'rxjs';
import { Product } from 'src/models/product';
import { ElectricalClientService } from 'src/services/electricalclientservice';
import { ElectronicsClientService } from 'src/services/electronicsclientservice';

@Component({
  selector: 'app-combineproduct-component',
  templateUrl: './app.combineproduct.view.html'
})
export class CombineProductsComponent implements OnInit {

  products:Array<Product>;

  constructor(private electronicsServ:ElectronicsClientService,
    private electricalServ:ElectricalClientService) {
      this.products = new Array<Product>();
    }

  ngOnInit(): void {
    // Get the Observables from the API calls
    combineLatest({
      electronicsProducts:this.electronicsServ.get(),
      electricalProducts:this.electricalServ.get()
    }).pipe(map(resp=>{
      // Process these Observables
      const electronicsProductsList = resp.electronicsProducts;
      const electricalProductsList = resp.electricalProducts;

      const productsList:Array<Product>=new Array<Product>();

      electronicsProductsList.map((product:Product)=>{
        productsList.push(product);
      });
      electricalProductsList.map((product:Product)=>{
        productsList.push(product);
      });
      console.log(`Combine Products ${JSON.stringify(productsList)}`);
      // Return the processed Observables
      return productsList;
    })).subscribe((data)=>{
      this.products = data;
    });
  }
}
Listing 6: The CombineProductsComponent
For the component, the HTML UI will be added using the app.combineproduct.view.html file. This file will use the app-table-component to show the combined products data. (Note: The code for the TableComponent is already provided in the previous article code.). The markup code for the CombineProductsComponent is shown in Listing 7
<h1>Using RxJs CombineLatest</h1>

<app-table-component [DataSource]="products"></app-table-component>
Listing 7: The CombineProductsComponent UI
The DataSource is the property exposed by the TableCompoenent which is bound with the products array defined in the CombineProductsComponent. This shows the combined products in the Table.
To run the application, modify the app.module.ts and make the CombineProductsComponent a bootstrap component. Modify the index.html and add the selector for the CombineProductsComponent in it so that the UI can be rendered. To run the Angular application along with REST APIs we need to modify the package.json as shown in Listing 8 (Red Marked)
 "scripts": {
    "ng": "ng",
    "custservice":"nodemon ./server/customersservice.js",
    "ordservice":"nodemon ./server/ordersservice.js",
    "electronicsservice":"nodemon ./server/electronicsservice.js",
    "electricalervice":"nodemon ./server/electricalservice.js",
    "ngclient":"ng serve",
    "start": "npm-run-all -p electronicsservice electricalervice ngclient",
    "build": "ng build",
    "watch": "ng build --watch --configuration development",
    "test": "ng test"
  }
Listing 8: package.json with the command to run REST APIs
Open the command prompt and navigate to the parallel-calls folder (this is the application folder in my case. If you have cloned the git code then navigate to the folder created after cloning the code). Run the following command to run the application
npm run start
This will start Angular Application on port 4200 and REST APIs on ports 8011 and 8012. Open the browser and browse http://localhost:4200, the Angular application will be loaded with combined products as shown in Figure 2

Figure 2: The Combined Products
The code for this article can be downloaded from this link.
Conclusion: Using Rxjs operators we can effectively work with the REST APIs and manage the Observables easily.


