Uploading Excel File to ASP.NET Core 6 application to save data from Excel to SQL Server Database
Recently, while conducting a session on ASP.NET Core 6, my client raised a query regarding uploading excel files to the ASP.NET Core MVC application and then further saving data from excel to the SQL Server Database table. I gave him the solution and then thought to write a post on it. As we all know, the Excel Workbook is one of the most heavily used files to save data. But to persist data it is recommended that it should be stored in an SQL Server database. If the data is stored in an SQL Server database it can be queried easily.
Figure 1, explains an implementation of the application which we are going to discuss in the article.
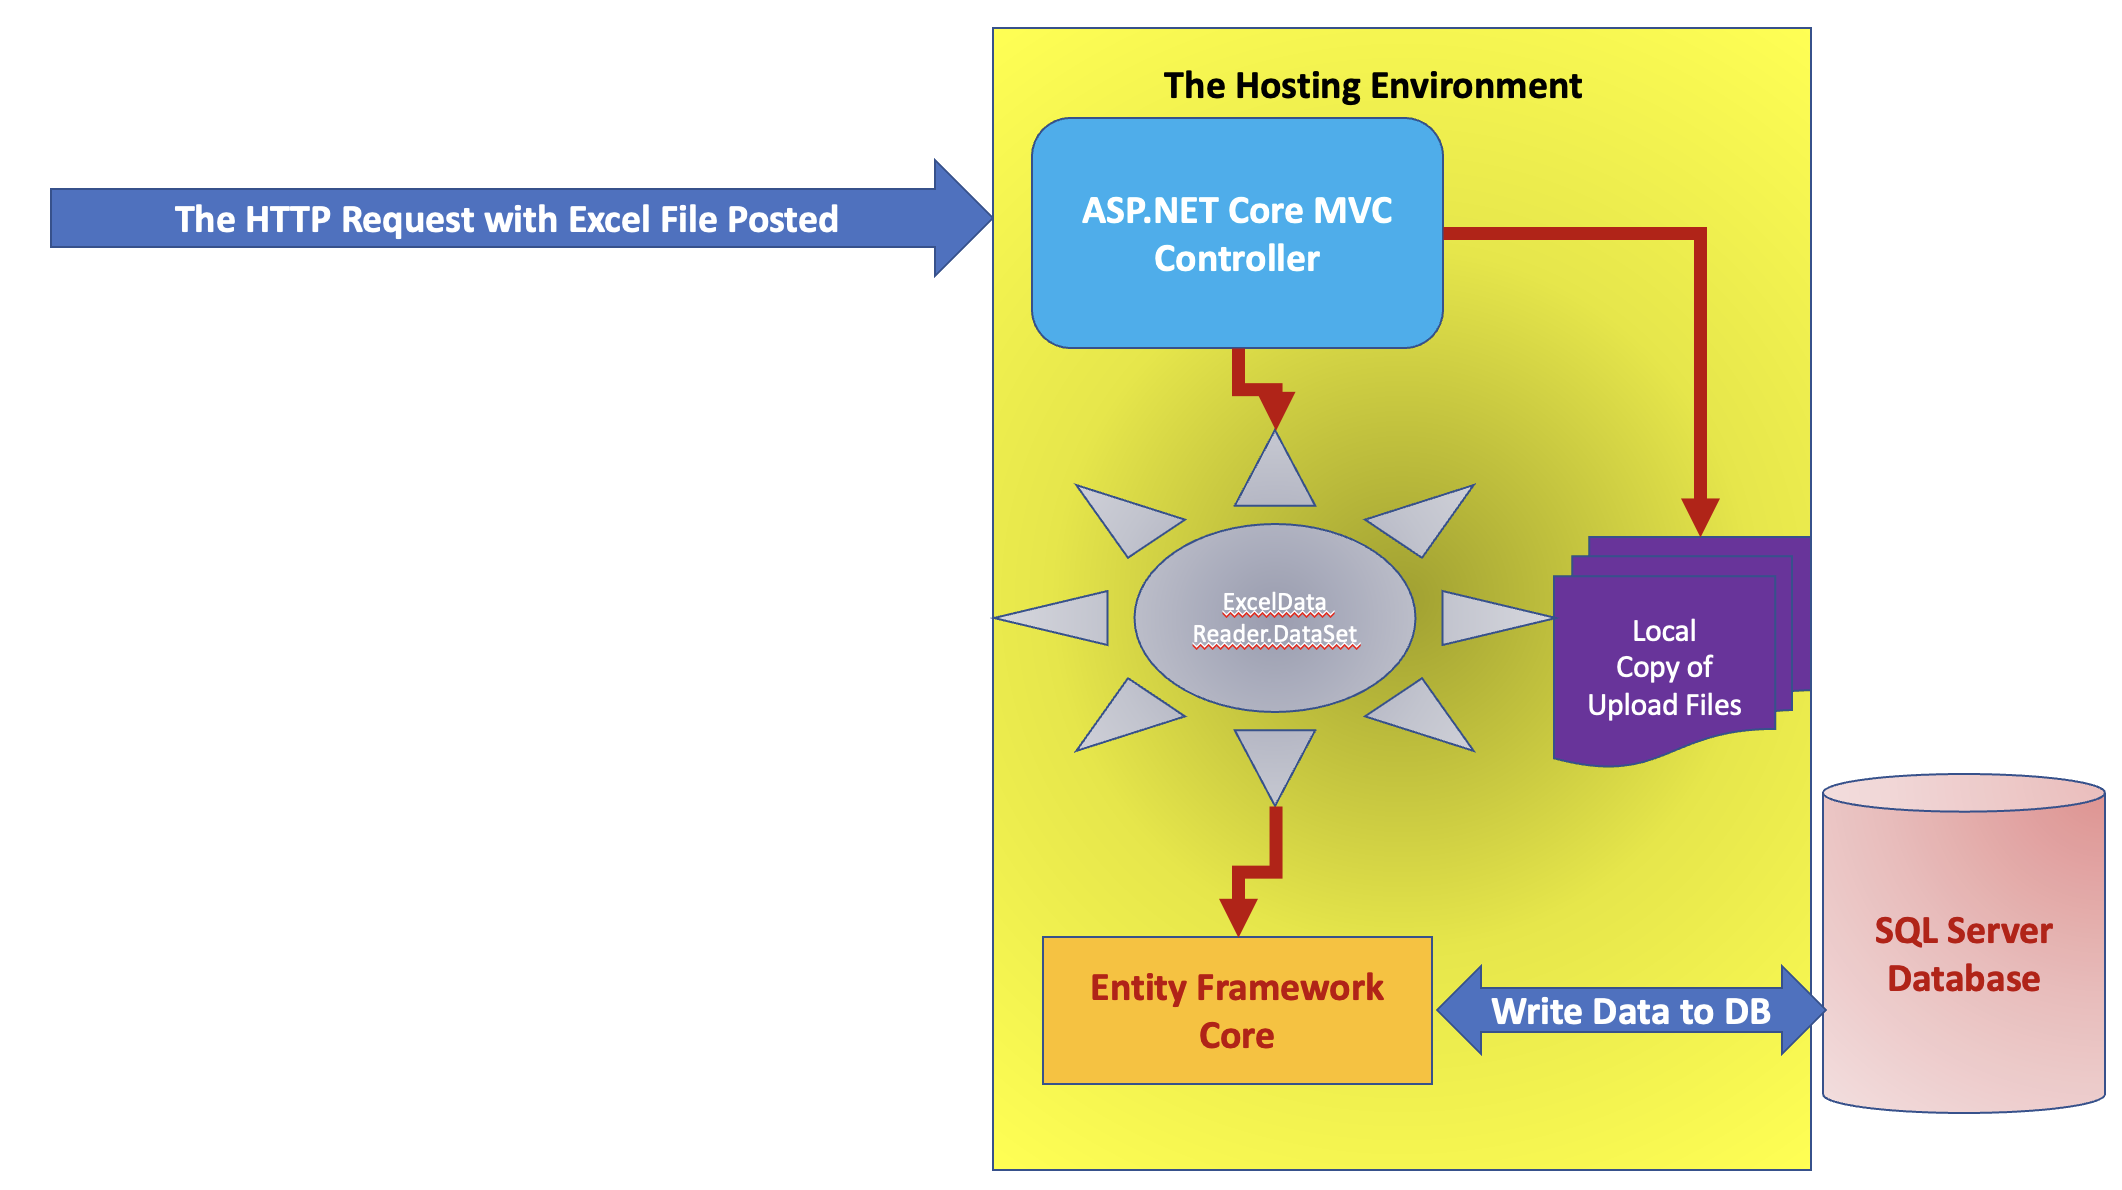
Figure 1: The ASP.NET Core That accepts Excel files and then further store data from Excel Files in SQL Server Database
The ExcelDataReader.DataSet Library
To read excel files in ASP.NET Core applications, we need to use the ExcelDataReader.DataSet package. This is a lightweight and fast library for reading Excel files in .NET applications. This is written in C#. This library provides ExcelReaderFactory class. This class contains methods to read Excel by accepting the Filstream object. The FilsStream object is used to open the Excel file so that it can be available to read. The CreateBinaryReader() and CreateOpenXmlReader() methods of the ExcelReaderFactory class are used to read .xls and .xlsx files respectively. These methods accept the FileStream object and return an IExcelDataReader type. This interface is a Reader that is used to read data from the stream. There exists an AsDataSet() extension method for the IExcelDataReader interface, which loads the data from the reader into the DataSet by creating a DataTable in it. Once the data is present on the DataSet it can be further read and saved into the SQL Server database.
Since we are reading an Excel file in the .NET Core application, we need to register the encoding provider. If you are using either a macOS or Linux machine to run the ASP.NET Core application, then it's better to register the encoding provider so that we can read Excel files without any exceptions. We can register this encoding using System.Text.Encoding.CodePages package.
Please note that I have written code for this article using a macOS with an M1 chip and using Visual Studio 2022 enterprise for mac.
Step 1: Open Visual Studio 2022 and create an ASP.NET Core API application. Name this application MVC_Read_Excel. Since we are going to use Entity Framework Core please install the following packages from the command prompt or Terminal window by navigating to the Project folder.
dotnet add package Microsoft.EntityFrameworkCore -v 6.0.0
dotnet add package Microsoft.EntityFrameworkCore.SqlServer -v 6.0.0
dotnet add package Microsoft.EntityFrameworkCore.Design -v 6.0.0
dotnet add package Microsoft.EntityFrameworkCore.Tools -v 6.0.0
dotnet add package ExcelDataReader.DataSet
dotnet add package System.Text.Encoding.CodePages
Alternatively, you can also make use of the Manage NuGet Package window to install these packages.
Step 2: Open the SQL Server Database Management Studio and run the script as shown in Listing 1 to create a database and table so that the data read from the excel file can be stored in the table.
Create Database Servicing;

use Servicing;

Create Table CustomerResponseDetails(

  ResponseId int IDENTITY (1,1) Primary Key,
  ServiceEngineerName varchar(200) Not Null,
  CustomerName varchar(200) Not Null,
  Address varchar(500) Not null,
  City varchar(100) Not null,
  ComplaintType varchar(100) Not Null,
  DeviceName varchar(100) Not Null,
  ComplaintDate datetime Not Null,
  VisitDate datetime Not Null,
  ComplaintDetails varchar(1000),
  RepairDetails varchar(1000),
  ResolveDate datetime not null,
  Fees DECIMAL not null,
  UploadDate DATETIME not null
);
Listing 1: Database and table Script
Step 3: To use the Database First approach of the Entity Framework Core so that we can generate entity class from the database, run the command from the Command Prompt or the terminal window as shown in Listing 2
dotnet ef dbcontext scaffold "Data Source=MyDbServer;Initial Catalog=Servicing;User Id=sa;Password=MyPwd" Microsoft.EntityFrameworkCore.SqlServer -o Models
Listing 2: The Command to generate entity class using database first approach
Once the command in listing 1 run successfully, the project will be added with the Models folder which has the CustomerResponseDetail and ServicingContext classes. The ServicingContext class contains the database connection string on its OnConfiguring() method. Move this connection string in the appsettings.json file as shown in Listing 3
 "ConnectionStrings": {
    "DBConnectionString": "Data Source=MyDbServer;Initial Catalog=Servicing;User Id=sa;Password=MyPwd"
  }
Listing 3: The Connection String in appsettings.json
Step 4: Register the ServicingContext class in the Dependency Injection Container in the ASP.NET Core application using the Program.cs file as shown in Listing 4
builder.Services.AddDbContext<ServicingContext>(options =>
{
    options.UseSqlServer(builder.Configuration.GetConnectionString
    ("DBConnectionString"));
});
Listing 4: registration of the ServicingContext class in the Dependency Container
Step 5: Let's modify the ErrorViewModel.cs class from the Models folder, to show error messages on Error view if any error occurs. Listing 5 shows the additional properties
public class ErrorViewModel
{
    .....
    public string ControllerName { get; set; } = string.Empty;
    public string ActionName { get; set; } = string.Empty;
    public string ErrorMessage { get; set; } = string.Empty;

}
Listing 5: The ErrorViewModel class modification
Step 6: In the Controllers folder, add a new Empty MVC controller and name it DataUploadController. In this controller add the code as shown in Listing 6
using System;
using System.IO;
using System.Collections.Generic;
using System.Linq;
using System.Threading.Tasks;
using Microsoft.AspNetCore.Http;
using Microsoft.AspNetCore.Mvc;
using MVC_Read_Excel.Models;
using ExcelDataReader;
using System.Data;
using Microsoft.EntityFrameworkCore;

// For more information on enabling MVC for empty projects, visit https://go.microsoft.com/fwlink/?LinkID=397860

namespace MVC_Read_Excel.Controllers
{
    public class DataUploadController : Controller
    {
        IConfiguration configuration;
        IWebHostEnvironment hostEnvironment;
        ServicingContext context;
        IExcelDataReader reader;
        public DataUploadController(IConfiguration configuration, IWebHostEnvironment hostEnvironment, ServicingContext context)
        {
            this.configuration = configuration;
            this.hostEnvironment = hostEnvironment;
            this.context = context;
        }

        // GET: /<controller>/
        public async Task<IActionResult> Index()
        {
            var customerResponseDetails = await context.CustomerResponseDetails.ToListAsync();
            return View(customerResponseDetails);
        }
        [HttpPost]
        public async Task<IActionResult> Index(IFormFile file)
        {
            try
            {
                // Check the File is received

                if (file == null)
                    throw new Exception("File is Not Received...");


                // Create the Directory if it is not exist
                string dirPath = Path.Combine(hostEnvironment.WebRootPath, "ReceivedReports");
                if (!Directory.Exists(dirPath))
                {
                    Directory.CreateDirectory(dirPath);
                }

                // MAke sure that only Excel file is used
                string dataFileName = Path.GetFileName(file.FileName);

                string extension = Path.GetExtension(dataFileName);

                string[] allowedExtsnions = new string[] { ".xls", ".xlsx"};

                if (!allowedExtsnions.Contains(extension))
                    throw new Exception("Sorry! This file is not allowed,
                      make sure that file having extension as either .xls or .xlsx is uploaded.");

                // Make a Copy of the Posted File from the Received HTTP Request
                string saveToPath = Path.Combine(dirPath, dataFileName);

                using (FileStream stream = new FileStream(saveToPath, FileMode.Create))
                {
                    file.CopyTo(stream);
                }

// USe this to handle Encodeing differences in .NET Core
System.Text.Encoding.RegisterProvider(System.Text.CodePagesEncodingProvider.Instance);
                // read the excel file
                using (var stream = new FileStream(saveToPath,FileMode.Open))
                {
                    if (extension == ".xls")
                        reader = ExcelReaderFactory.CreateBinaryReader(stream);
                    else
                        reader = ExcelReaderFactory.CreateOpenXmlReader(stream);

                    DataSet ds = new DataSet();
                    ds = reader.AsDataSet();
                    reader.Close();

                    if (ds != null && ds.Tables.Count > 0)
                    {
                        // Read the the Table
                        DataTable serviceDetails = ds.Tables[0];
                        for (int i = 1; i < serviceDetails.Rows.Count; i++)
                        {
                            CustomerResponseDetail details = new CustomerResponseDetail();
                            details.ServiceEngineerName = serviceDetails.Rows[i][0].ToString();
                            details.CustomerName = serviceDetails.Rows[i][1].ToString();
                            details.Address = serviceDetails.Rows[i][2].ToString();
                            details.City = serviceDetails.Rows[i][3].ToString();
                            details.ComplaintType = serviceDetails.Rows[i][4].ToString();
                            details.DeviceName = serviceDetails.Rows[i][5].ToString();
                            details.ComplaintDate = Convert.ToDateTime( serviceDetails.Rows[i][6].ToString());
                            details.VisitDate = Convert.ToDateTime(serviceDetails.Rows[i][7].ToString());
                            details.ComplaintDetails = serviceDetails.Rows[i][8].ToString();
                            details.RepairDetails = serviceDetails.Rows[i][9].ToString();
                            details.ResolveDate = Convert.ToDateTime(serviceDetails.Rows[i][10].ToString());

                            details.Fees = Convert.ToDecimal(serviceDetails.Rows[i][11].ToString());
                            details.UploadDate = DateTime.Now;


                            // Add the record in Database
                            await context.CustomerResponseDetails.AddAsync(details);
                            await context.SaveChangesAsync();
                        }
                    }
                }
                return RedirectToAction("Index");
            }
            catch (Exception ex)
            {
                return View("Error", new ErrorViewModel()
                {
                    ControllerName = this.RouteData.Values["controller"].ToString(),
                    ActionName = this.RouteData.Values["action"].ToString(),
                    ErrorMessage = ex.Message
                });
            }
        }

    }
}
Listing 6: The DataUploadController
The code in the Listing 6 is the heart of the application. The code has the following specifications
- The controller is a constructor injected using IConfiguration, IWebHostingEnvironment interfaces, and ServicingContext class. The IConfiguration interface is used to read the appsettings.json file, whereas the IWebHostingEnvironment interface is used to provide information about the hosting environment of the application where the application is running. We need the IWebHostingEnvironment interface to create a folder and write the uploaded file in it so that it can be read on the server. The ServicingContext class is used to perform database operations.
- The Index() HttpGet method reads data from the database table using CustomerResponseDetails DbSet<CustomerresponseDetail> property of the ServicingContext class. The data is sent to the Index view.
- The Index() with the HttpPost method is very important here. This method accepts IFormFile as an input parameter. The IFormFile represents the uploaded file from the client using the HttpPost request. The Index() method first makes sure that the file is received, if not then an exception is thrown. If the file is received, then the ReceivedReports folder will be created inside the wwwroot folder. The path of the wwwroot folder is read using the WebRootPath IWebHotingEnvironment. Once the folder is created, the method checks if the received file is either of .xls or .xlsx, if not then an exception is thrown. If the received file is of the Excel type then it will be copied into the ReceivedReports folder. Once the file is created we need to register the Encoding to read the Excel file. (I have already explained this at the beginning of this article.) Once the encoding is registered, the file is read using the FileStream object. This object is further passed to the CreateOpenXmlReader() method of the ExcelReaderFactory class. (I have already explained about the ExcelDataReader.DataSet at the beginning of this article.) The ExcelDataReader.DataSet is further used to read the contents of the file and added to the database table using the ServicingContext class instance.
- While processing the excel file, if any exception occurs then the Error View will be returned else the Index view will be returned.
Step 7: Generate Index View with the HTML code for the DataUploadController as shown in Listing 7
@model IEnumerable<MVC_Read_Excel.Models.CustomerResponseDetail>
@{
    ViewData["Title"] = "Home Page";
}

<div class="container">
    <table class="table table-bordered table-striped">
        <thead>
            <tr>
                <th>
                    ResponseId
                </th>
                <th>
                    ServiceEngineerName
                </th>
                <th>
                    Address
                </th>
                <th>
                    City
                </th>
                <th>
                    ComplaintType
                </th>
                <th>
                    DeviceName
                </th>
                <th>
                    Complainthate
                </th>
                <th>
                    Visithate
                </th>
                <th>
                    Complainthetails
                </th>
                <th>
                    RepairDetails
                </th>
                <th>
                    ResolveDate
                </th>
                <th>
                    Fees
                </th>
                <th>
                    UploadDate
                </th>
            </tr>
        </thead>
        <tbody>
            @foreach (var details in Model)
            {
               <tr>
                   <td>
                       @details.ResponseId
                   </td>
                   <td>
                       @details.ServiceEngineerName
                   </td>
                   <td>
                       @details.CustomerName
                   </td>
                   <td>
                       @details.Address
                   </td>
                   <td>
                       @details.City
                   </td>
                   <td>
                       @details.ComplaintType
                   </td>
                   <td>
                       @details.ComplaintDate
                   </td>
                   <td>
                       @details.VisitDate
                   </td>
                   <td>
                       @details.ComplaintDetails
                   </td>
                   <td>
                       @details.RepairDetails
                   </td>
                   <td>
                       @details.ResolveDate
                   </td>
                   <td>
                       @details.Fees
                   </td>
                   <td>
                       @details.UploadDate
                   </td>


               </tr>
            }
        </tbody>
    </table>
</div>

<div class="text-center">
    <form asp-controller="DataUpload" asp-action="Index" method="post" enctype="multipart/form-data">
        <input type="file" name="file" />
        <input type="submit" value="Upload" />
    </form>
</div>
Listing 7: The Index View
As shown in Listing 7, we have the form that uses the HTML file element which is used to upload the file. The form will be posted to the DataUpload controller to the Index action method. Once the data is successfully added to the database server then it will be displayed on the Index view.
Step 8: I have created an Excel file that contains data as shown in Figure 2

Figure 2: The Excel file
Note: The columns in the excel file matched those with the SQL Server table which we have created in step 2.
Step 9: Modify the _Layout.cshtml file in the Shared sub-folder of the Views folder so that we can define the link to request the DataUpload Controller as shown in Listing 8
<li class="nav-item">
      <a class="nav-link text-dark"
          asp-area="" asp-controller="DataUpload"
          asp-action="Index">Data Upload</a>
</li>
Listing 8: The Link for the DataUpload controller
Run the Application and request for the DataUpload Controller, as shown in Figure 3, the Index page of the DataUpload controller will be shown.

Figure 3: The Index view of the DataUpload Controller
Now chose the Excel file and click on the Upload button, the file will be uploaded to the server and then its data will be read and added to the database table as shown in Figure 4

Figure 4: The uploaded data
So the data is successfully added to the table. If you try to upload a file other than the .xls or .xlsx, then the error view will be loaded as shown in Figure 5

Figure 5: Error View
The application is accepting only excel files.
The code for this article can be downloaded from this link.
Conclusion: The Excel file upload and reading to the ASP.NET Core app is easy, this provides the facility to read the bulk data from the Excel file and store it in SQL Server Database.


