Angular 15: Performing Parallel HTTP Calls to REST APIs using RxJs 7.8
In this article, we will see the mechanism for accessing external REST APIs by making parallel calls using RxJs. Angular, being the great framework for building complex front-end apps, various times we need to make HTTP calls to REST APIs to fetch data to show on UI. Of course, Angular provides HttpClientModule and HttpClient classes to manage asynchronous HTTP calls. The HttpClient provides get(), post(), put(), and delete() methods to perform HTTP operations and all these methods return an Observable object. Objeservable is the most basic building block provided in RxJs. An Observable represents a set of values received over any time, this means that when the HTTP call returns data from REST API it is immediately delivered to UI so that the UI can be updated.
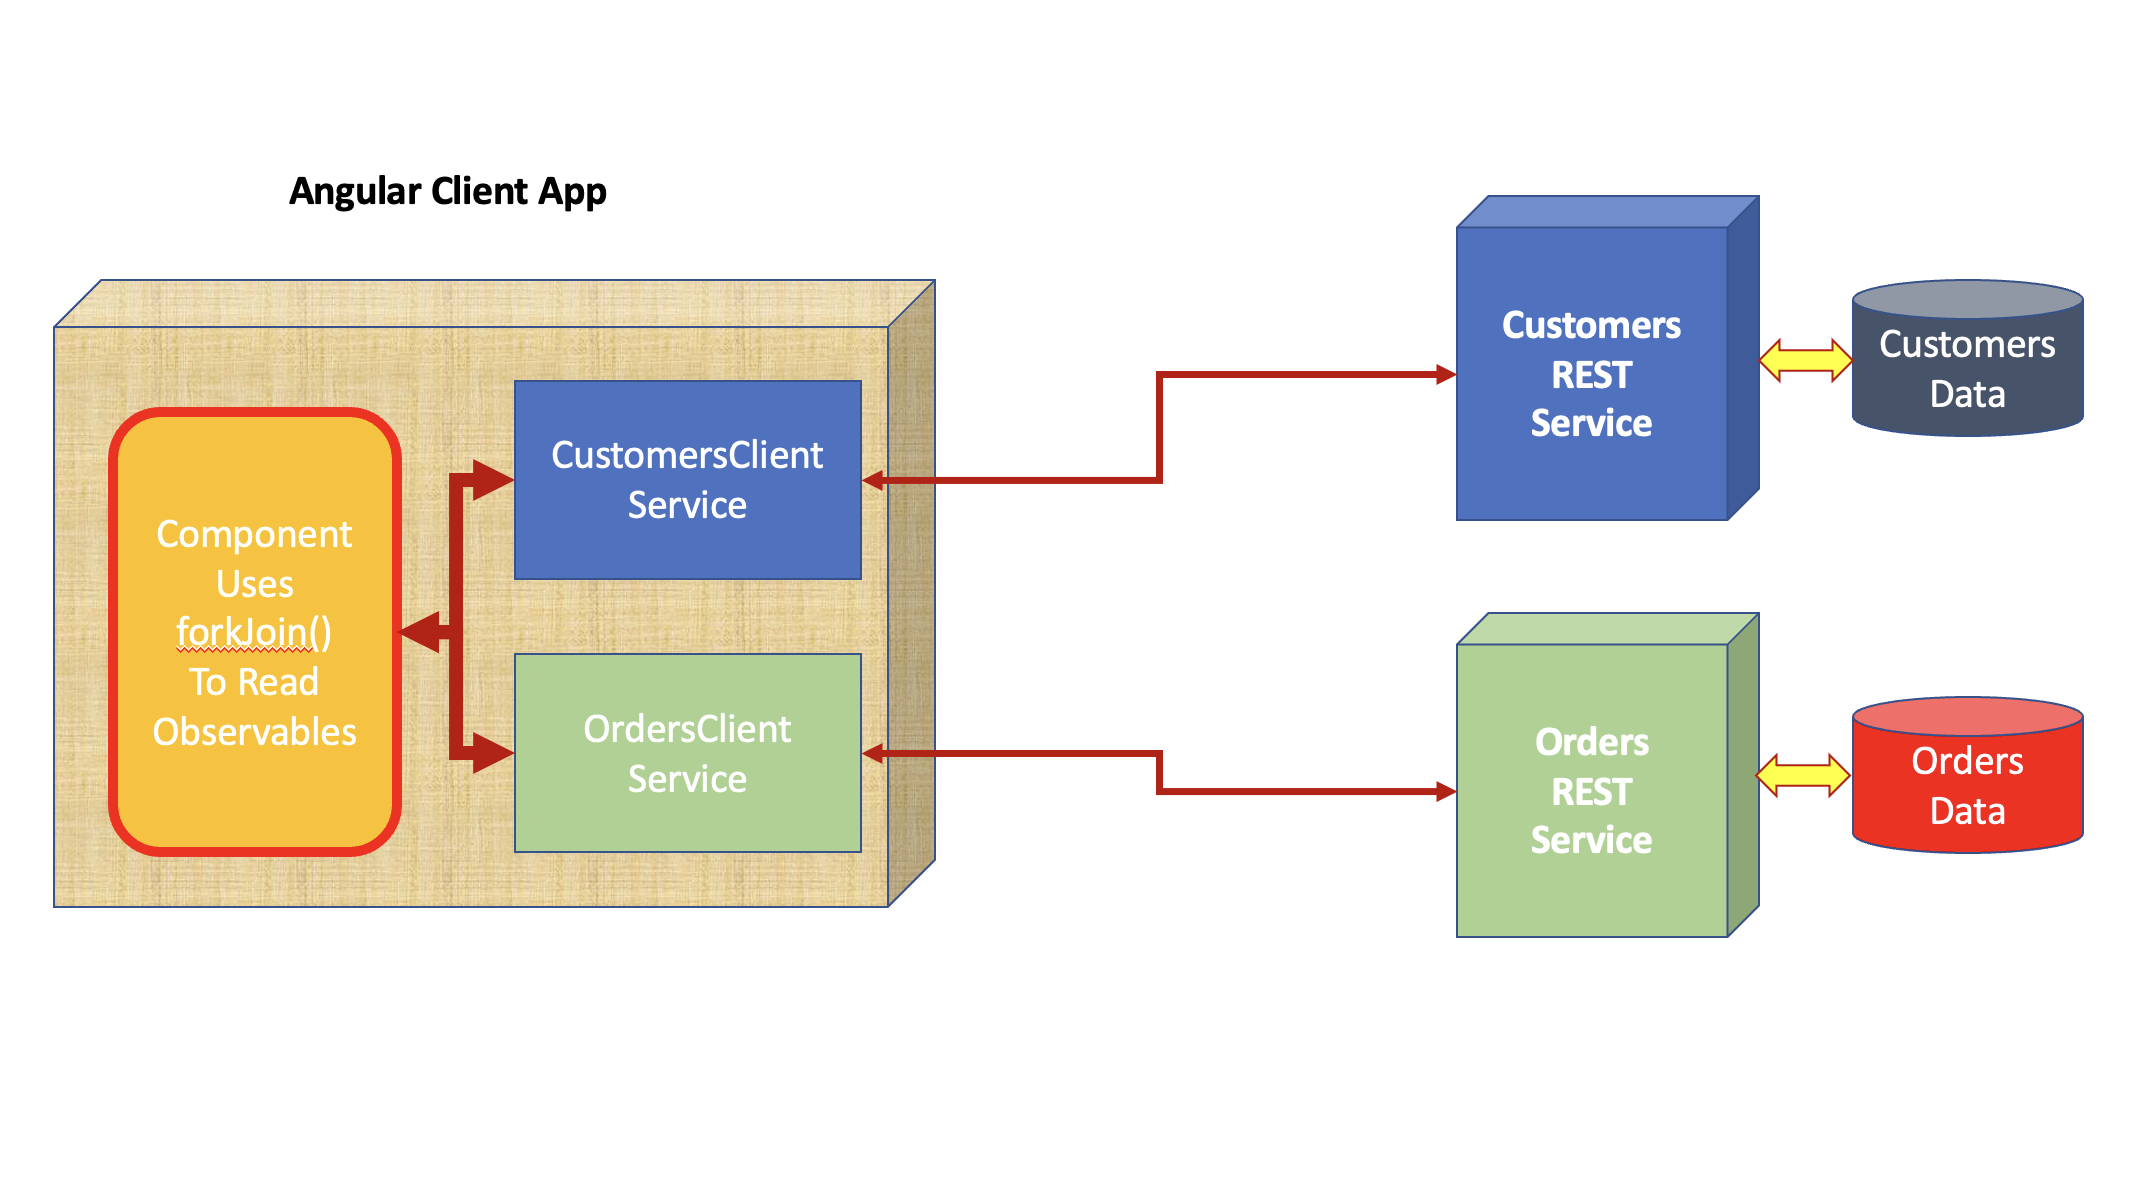
There is one more use case that must be considered which makes parallel HTTP calls to REST APIs to fetch data. Here, the challenge is how to collect these multiple observables at a time and pass them to UI? Figure 1 shows the situation of making parallel HTTP calls
Figure 1: Parallel HTTP Calls to REST API
Figure 1 explains the use case for parallel HTTP calls. We must use the RxJs object model to make sure that handle data received from these parallel HTTP calls made by the Angular application. We can use RxJx operators as follows
- pipe()
- We use this function to return a resolved value from the observable.
- map()
- It transforms the provided source object to the new output object based on the condition.
- forkJoin()
- We use forkJoin() when we have received multiple completed Observables and we want to collect the final emitted observable value. In the current use case, when we perform parallel HTTP calls we will be receiving multiple observables, using forkJoin() we will be able to make sure that all observables are collected and delivered to UI.
import express from 'express';
import cors from 'cors';


const Customers = [
  {CustomerId:101,CustomerName:'MSIT', City:'Pune-East'},
  {CustomerId:102,CustomerName:'LSIT', City:'Pune-West'},
  {CustomerId:103,CustomerName:'TSIT', City:'Pune-South'},
  {CustomerId:104,CustomerName:'DNCD', City:'Pune-North'},
  {CustomerId:105,CustomerName:'DEVC', City:'Pune-East'},
  {CustomerId:106,CustomerName:'DNTV', City:'Pune-West'},
  {CustomerId:107,CustomerName:'MSTV', City:'Pune-South'},
  {CustomerId:107,CustomerName:'TSTV', City:'Pune-East'},
  {CustomerId:108,CustomerName:'LSTV', City:'Pune-North'},
  {CustomerId:109,CustomerName:'VPIT', City:'Pune-East'},
  {CustomerId:110,CustomerName:'SAIT', City:'Pune-West'}
];

const PORT =  process.env.PORT || 7011;
// create an instance
const instance = express();
// Add JSON Middleware in HTTP Pipeline
instance.use(express.json());
// do not parse incoming data other than HTTP Request Message Body
instance.use(express.urlencoded({extended:false}));
// configure CORS
instance.use(cors({
    origin: "*",
    methods: "*",
    allowedHeaders: "*"
}));

instance.get('/api/customers', (req,resp)=>{
   resp.status(200).send(Customers);
});

instance.listen(PORT, ()=>{
  console.log('Customer Service Started on Port');
});
import express from 'express';
import cors from 'cors';


const Orders = [
  {OrderId:'A-Ord-101', OrderedItem:'Laptop', Quantity:10},
  {OrderId:'A-Ord-102', OrderedItem:'Desktop', Quantity:30},
  {OrderId:'A-Ord-103', OrderedItem:'Printers', Quantity:50},
  {OrderId:'A-Ord-104', OrderedItem:'HDD', Quantity:500},
  {OrderId:'A-Ord-105', OrderedItem:'SDD', Quantity:3000},
  {OrderId:'A-Ord-106', OrderedItem:'USB', Quantity:7000},
  {OrderId:'A-Ord-107', OrderedItem:'Mouse', Quantity:10000},
  {OrderId:'A-Ord-108', OrderedItem:'Keyboard', Quantity:8000},
  {OrderId:'A-Ord-109', OrderedItem:'Adapter', Quantity:2000},
  {OrderId:'A-Ord-110', OrderedItem:'Display', Quantity:5000},
];

const PORT =  process.env.PORT || 7012;
// create an instance
const instance = express();
// Add JSON Middleware in HTTP Pipeline
instance.use(express.json());
// do not parse incoming data other than HTTP Request Message Body
instance.use(express.urlencoded({extended:false}));
// configure CORS
instance.use(cors({
    origin: "*",
    methods: "*",
    allowedHeaders: "*"
}));

instance.get('/api/orders', (req,resp)=>{
   resp.status(200).send(Orders);
});

instance.listen(PORT, ()=>{
  console.log('Customer Service Started on Port');
});
customers.js

export class Customers{
 [x:string]:any;
  constructor(
    public CustomerId:number,
    public CustomerName:string,
    public City:string
  ){}
}


orders.js

export class Orders{
  [x:string]:any;
  constructor(
    public OrderId:string,
    public OrderedItem:string,
    public Quantity:number
  ){}
}
import { Injectable } from '@angular/core';
import { HttpClient } from '@angular/common/http';
import { Observable,pipe,map } from 'rxjs';
import { Customers } from 'src/models/customers';

@Injectable({providedIn: 'root'})
export class CustomerClientService {
  private url = 'http://localhost:7011/api/customers';
  constructor(private httpClient: HttpClient) { }

  get():Observable<Customers[]>{
    const resp = this.httpClient.get<Customers[]>(this.url);
    return resp.pipe(map(result=>result));
  }

}
import { Injectable } from '@angular/core';
import { HttpClient } from '@angular/common/http';
import { Observable,pipe,map } from 'rxjs';
import { Orders } from 'src/models/orders';

@Injectable({providedIn: 'root'})
export class OrderClientService {
  private url:string ='http://localhost:7012/api/orders';
  constructor(private httpClient: HttpClient) { }

  get():Observable<Orders[]> {
    const resp = this.httpClient.get<Orders[]>(this.url);
    return resp.pipe(map(result=>result));
  }
}
import { Component, Input, OnInit } from '@angular/core';

@Component({
  selector: 'app-table-component',
  templateUrl: './app.table.view.html'
})

export class TableComponent implements OnInit {

  private _DataSource:Array<any>;
  tableColumns: Array<string>;
  constructor() {
    this._DataSource = new Array<any>();
    this.tableColumns = new Array<string>();
  }

  ngOnInit() {

  }

  @Input()
  set DataSource(val:Array<any>){
    this._DataSource = val;
    this.tableColumns = Object.keys(this._DataSource[0]);
      }

  get DataSource():Array<any>{
    return this._DataSource;
  }

}
<table class="table table-striped table-dark table-bordered table-sm"
cellspacing="0"
width="100%">
  <thead>
    <tr>
      <th *ngFor="let h of tableColumns">{{h}}</th>
    </tr>
  </thead>
  <tbody>
    <tr *ngFor="let r of DataSource">
        <td *ngFor="let h of tableColumns">
          {{r[h]}}
        </td>
    </tr>
  </tbody>
</table>
import { Component, OnInit } from '@angular/core';
import { forkJoin } from 'rxjs';
import { Customers } from 'src/models/customers';
import { Orders } from 'src/models/orders';
import { CustomerClientService } from 'src/services/customerclientservice';
import { OrderClientService } from 'src/services/orderclientservice';

@Component({
  selector: 'app-root',
  templateUrl: './app.component.html'
})
export class AppComponent implements OnInit {
  customersData: Array<Customers>;
  ordersData:Array<Orders>;
  // Inject Angular Services
  constructor(
    private custServ:CustomerClientService, private ordServ:OrderClientService
  ){
    this.customersData = new Array<Customers>();
    this.ordersData = new Array<Orders>();
  }

  ngOnInit(): void {
    // Receive Observables
    const customers$ = this.custServ.get();
    const orders$ = this.ordServ.get();
    // Resolve these observables to read emited data
    // from Bbservables
    forkJoin([customers$,orders$]).subscribe(result=>{
      // read the emitted data from the received
      // Observables
       this.customersData = result[0];
       this.ordersData = result[1];
    });
  }
}
<h1>Calling Services Parallely using RxJs</h1>

<h2>Customers Data</h2>

<app-table-component [DataSource]="customersData"></app-table-component>

<hr/>

<h2>Orders Data</h2>

<app-table-component [DataSource]="ordersData"></app-table-component>
 "styles": [
              "src/styles.css",
              "./node_modules/bootstrap/dist/css/bootstrap.min.css"
            ]
"scripts": {
    "ng": "ng",
    "custservice":"nodemon ./server/customersservice.js",
    "ordservice":"nodemon ./server/ordersservice.js",
    "ngclient":"ng serve",
    "start": "npm-run-all -p custservice ordservice ngclient",
    "build": "ng build",
    "watch": "ng build --watch --configuration development",
    "test": "ng test"
  },


