ASP.NET Core: Using YARP (Yet Another Reverse Proxy) for ASP.NET Core Apps to create API Gateways
In this article, we will understand and use the YARP (Yet Another Reverse Proxy). This is highly customizable reverse proxy library for .NET. This is especially designed to provide easy but yes secure, scalable, flexible and robust framework for modern ASP.NET Core API Applications. The ASP.NET Core is one of the bests technologies to design, develop highly powerful, secure, and high performant web applications. Being a cross-platform technology, we can build complex server-side solutions using ASP.NET Core. Once of such complex solution is building Microservices application or the server-side application with multiple autonomous APIs. In such solutions we need to host these Microservices or autonomous APIs on separate hosts with separate IP addresses. With multiple services/API hosted, the client application like Browser Clients or Mobile Clients need to know host addresses of each of the service. This increases the complexity of the entire solution. E.g. if any of the service is changed with respect to its address then client application needs to be changed this increases the maintenance cost. One of the best ways of the server-side application development is to use the API gateways. YARP is one of such solutions.
YARP provides a reverse proxy server that sits between client and backend application structure. It forwards client requests to the appropriate backend server and then returns the server's response to the client. Figure 1 shows the YARP uses in ASP.NET Core application.
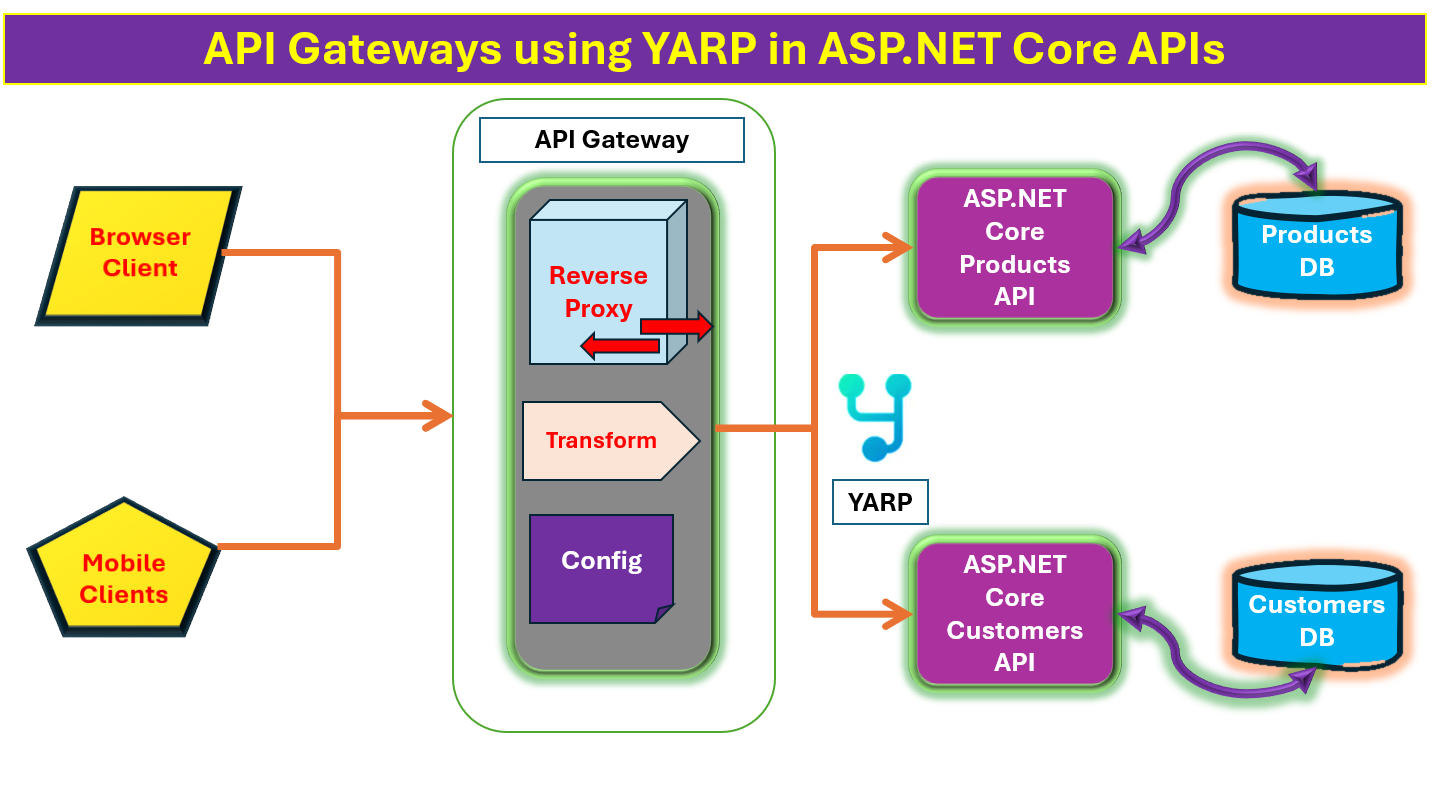
Figure 1: The YARP with ASP.NET Core
YARP provides following features:
- Routing:
- This is used to Directs requests to different backend servers based on predefined rules, such as URL patterns or request headers.
- Load Balancing:
- This is used to Distributes incoming traffic across multiple backend servers to prevent overloading a specific server. Distribution increases performance and reliability.
- Scalability
- YARP works by distributing traffic across multiple servers, the reverse proxy helps to scale apps to handle increasing users and higher loads. Backend servers scaled by adding or removing them without impacting the client.
- Connection abstraction decoupling and control over URL:
- The Inbound requests from external clients and outbound responses from the backend are independent
- Security:
- Internal service endpoints can be hidden from external exposure, protecting against various types of cyber attacks
- Caching:
- The Frequently requested resources can be cached to reduce the load on backend servers and improve response times.
- Versioning:
- Different versions of an API can be supported using different URL mappings
- Receiving requests:
- The reverse proxy listens the HTTP request from clients on specified ports and endpoints.
- Terminating Connections:
- The inbound HTTP connections are terminated at the proxy and the new connections are used for outbound requests to destinations.
- Routing requests:
- Based on configuration of routing rules, the reverse proxy checks which backend server, or cluster of servers, should handle the request.
- Forwarding requests:
- The reverse proxy then forwards the client request to the appropriate backend server by transforming the path and headers as per the requirements.
- Connection pooling:
- The outbound connections are pooled to reduce connection overhead.
- Processing responses:
- The backend server processes the request and sends a response back to the reverse proxy.
- Returning responses:
- The reverse proxy then receives the response from the backend server and forwards it back to the client.
- Yarp.ReverseProxy
- Yarp.Telemetry.Consumption
public class Customer
{
    public int CustomerId { get; set; }
    public string? CustomerName { get; set; }
    public string? Email { get; set; }

}

public class Product
{
    public int ProductId { get; set; }
    public string? ProductName { get; set; }
}
public class Customers : List<Customer>
{
        public Customers()
        {
            Add(new Customer() {CustomerId=101,CustomerName="Customer 1",Email="c1@cust.com" });
            Add(new Customer() { CustomerId = 102, CustomerName = "Customer 2", Email = "c2@cust.com" });
            Add(new Customer() { CustomerId = 103, CustomerName = "Customer 3", Email = "c3@cust.com" });
            Add(new Customer() { CustomerId = 104, CustomerName = "Customer 4", Email = "c4@cust.com" });
            Add(new Customer() { CustomerId = 104, CustomerName = "Customer 4", Email = "c4@cust.com" });
        }
}
public class Products : List<Product>
{
        public Products()
        {
            Add(new Product { ProductId = 1, ProductName = "Product 1" });
            Add(new Product { ProductId = 2, ProductName = "Product 2" });
            Add(new Product { ProductId = 3, ProductName = "Product 3" });
            Add(new Product { ProductId = 4, ProductName = "Product 4" });
            Add(new Product { ProductId = 5, ProductName = "Product 5" });
        }
}
app.MapGet("/customers", () =>
{
   var customers = new Customers();
    return Results.Ok(customers);
});

app.MapGet("/products", () =>
{
    var products = new DataStore.Products();
    return Results.Ok(products);
});

app.MapPost("/products", (Product prd) =>
{
    var products = new DataStore.Products();
    products.Add(prd);
    return Results.Ok(products);
});
{
    "AllowedHosts": "*",
    "Logging": {
        "LogLevel": {
            "Default": "Information",
            "Microsoft.AspNetCore": "Warning",
            "Yarp.ReverseProxy": "Debug"
        }
    },
  "ReverseProxy": {
        "Clusters": {
            "customer": {
                "Destinations": {
                    "customerService": {
                        "Address": "https://localhost:7001/"
                    }
                }
            },
            "product": {
                "Destinations": {
                    "productService": {
                        "Address": "https://localhost:7002/"
                    }
                }
            }
        },
        "Routes": {
            "customerRoute": {
                "ClusterId": "customer",
                "Match": {
                    "Path": "/customer/{**catch-all}"
                },
                "Transforms": [
                    { "PathRemovePrefix": "/customer" }
                ]
            },
            "productRoute": {
                "ClusterId": "product",
                "Match": {
                    "Path": "/product/{**catch-all}"
                },
                "Transforms": [
                    { "PathRemovePrefix": "/product" }
                ]
            }
        }
    }
}
.................
builder.Services.AddReverseProxy()
     .LoadFromConfig(builder.Configuration.GetSection("ReverseProxy")).ConfigureHttpClient((context, handler) =>
     {
         if (handler is SocketsHttpHandler socketsHttpHandler)
         {
             socketsHttpHandler.SslOptions.RemoteCertificateValidationCallback = (sender, certificate, chain, sslPolicyErrors) => true;
         }
     });

.....................


// Use top-level route registrations instead of UseEndpoints
app.MapReverseProxy();
.....


