Implementing Distributed Caching in ASP.NET Core 6 using the Redis Cache In Microsoft Azure
In this article, we will implement distributed caching for ASP.NET Core 6 applications using Redis Cache in Microsoft Azure. In highly responsive web applications as well as in Microservices applications caching plays a very important role. We use caching to store data so that it can be made available to the application at a fast speed when it is required. In ASP.NET Core, we can have caching implemented using In-Memory Cache and Distributed Cache.
The Caching Concept
A Cache is a mechanism using which the frequently demanded data is stored for a specific duration. Typically, the data required for searching can be stored in the cache and hence this helps to reduce the number of calls to the actual database. Since the data is immediately available to the application, the number of resource requirements e.g. waiting time for the Db Connections can be reduced and hence this results in the performance increase of the application.
The question is what type of data can be stored in the cache? Well, the data which is not changed frequently can be stored in the Cache. In ASP.NET Core, the caching is implemented using an In-Memory cache. This is the basic caching feature used by ASP.NET Core to store the data in the Web Server's memory. This means that it is available for the application running on that Web Server. Whereas Distributed Caching which is used by ASP.NET Core is used to make sure that the cache is available and shared by several application servers to read data. The distributed cache is managed independently by using a separate caching service. This is the reason that we use distributed caching especially for the Microservices Applications.
How does the Distributed Cache Work?
Figure 1, explains the working of the Distributed Cache.

Figure 1: Distributed Cache Work
When the request is received by the application, the first attempt is made to read data from the cache. If the data is available in the cache, then it is read from the cache and returned to the response. If the data is not available in the cache, then the connection will be established with the actual data store e.g. Database server, and the data will be read from the data store and then it will be stored in the cache for a specific duration and then it will be sent back to the response. The data from the cache is now available for all future requests till it is not expired.
The Redis Cache
The Redis Cache is an Open-Source, In-Memory data structure store. This is used as distributed, in-memory key-value database, cache, and message broker. Redis Cache supports several kinds of abstract data structures e.g. strings, lists, maps, stored sets, etc. We will be using Redis Cache on Microsoft Azure so that it can be used by our applications (Web App, API, and Microservices) deployed in Microsoft Azure.
Step 1: Login on Azure Portal using this link and Create a resource. Search for Azure Cache for Redis. The page for the Azure Cache for Redis will be loaded. On this page click on the Create button. Once the Create button is clicked, the new page will be loaded where the information for creating New Redis Cache can be entered as shown in Figure 2
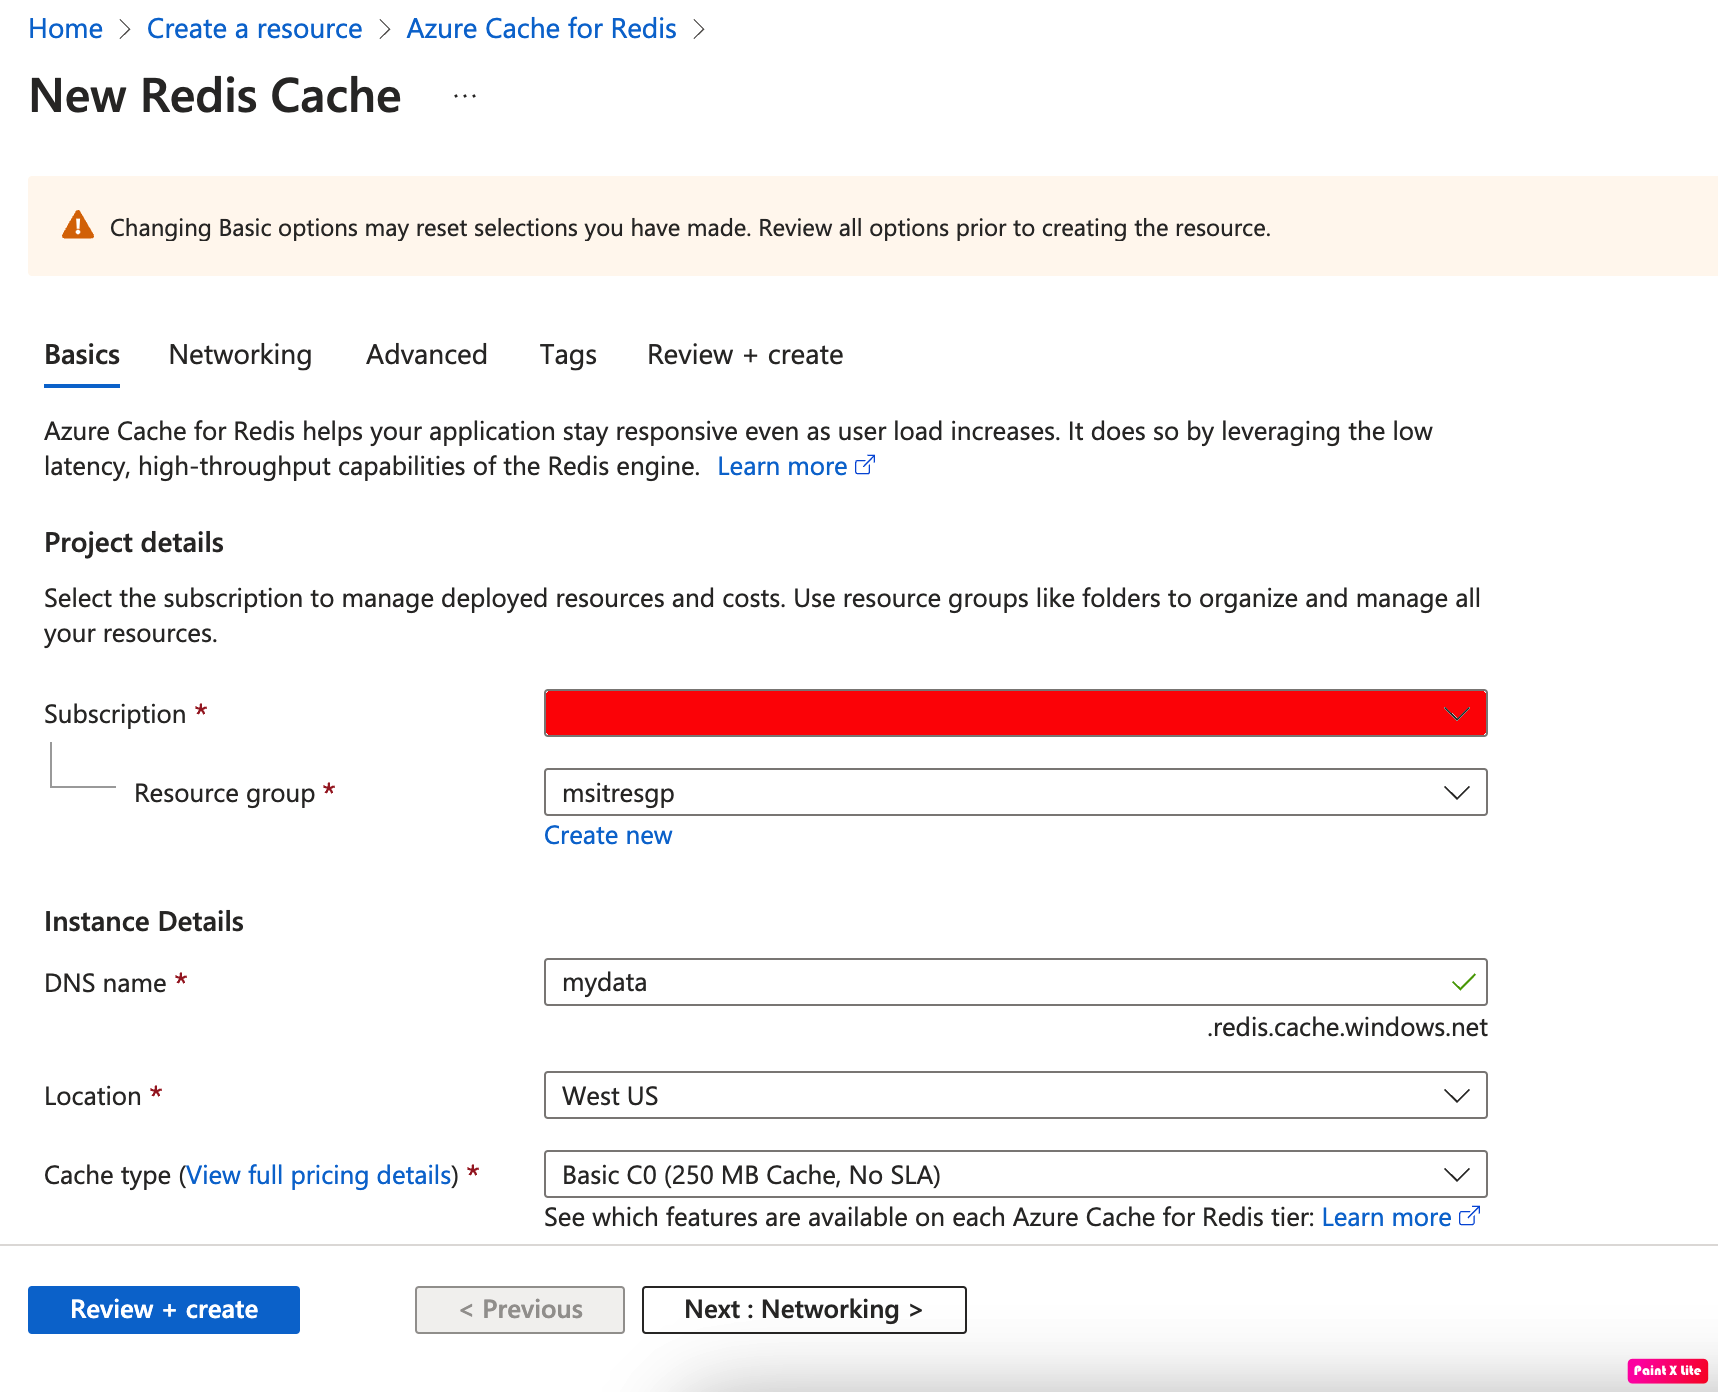
Figure 2: The New Redis Cache Details
On this page, you need to enter the subscription name, you have to select the Resource group under which the resource will be created. Set the Instance Name. This will be the Cache name that will be used in the client application. Select the Location and Cache Type. (Make sure that the price details are read carefully.) Click on the Networking button. On this page, we must select the approach of connecting to the Redis Cache. I have used Public Endpoint as shown in Figure 3

Figure 3: The Networking
On this page, click on the Advanced button, to navigate to the page where we need to select the Redis version. I have selected the Redis version as 6 as shown in Figure 4. This is the latest version.

Figure 4: The Redis Version
On this page, click on the Review + create button to create a Redis Cache. This will take some time to create Redis Cache.
Once the Redis Cache is created, go to its page and copy its Access Keys so that the client application can access it as shown in Figure 5

Figure 5: Radis Cache Access Keys
Step 2: I have used Azure SQL Database. Create a new Azure SQL Database using the Azure portal and name it as eShoppingCodi. In this database create a Category table using the script given in Listing 1
Create Table Category (
 CategoryId int Primary Key,
 CategoryName varchar(100) Not Null,
 BasePrice decimal Not Null
);

insert into Category Values(1001, 'Electronics', 2000);
insert into Category Values(1002, 'Electrical', 20);
insert into Category Values(1003, 'Food', 60);
insert into Category Values(1004, 'Fashion', 200);
insert into Category Values(1005, 'Electronics-IT', 4000);
insert into Category Values(1006, 'Electrical-HOME', 200);
insert into Category Values(1007, 'Food-Fast', 70);
insert into Category Values(1008, 'Fashion-Male', 800);
insert into Category Values(1009, 'Electronics-Entertainment', 7000);
insert into Category Values(1010, 'Electrical-Industry', 900);
insert into Category Values(1011, 'Food-Energy', 80);
insert into Category Values(1012, 'Fashion-Kids', 800);
Listing 1: Creating Category Table
The ASP.NET Core API application will use the Azure SQL Database to read data if it is not available in Redis Cache.
Step 3: Open Visual Studio 2022 and create a new ASP.NET Core API project, name this project as AspNet_Redis. Make sure that the target version selected is .NET 6. In this project add the following package references for using Entity Framework Core
Microsoft.EntityFrameworkCore
Microsoft.EntityFrameworkCore.SqlServer
Microsoft.EntityFrameworkCore.Design
Microsoft.EntityFrameworkCore.Tools
Once these packages are installed for the project, open the command prompt (or Terminal window) and navigate to the AspNet_Redis folder and run the command to generate DbContext and Entity classes to perform Database Read operations. The command is as shown in Listing 2
dotnet ef dbcontext scaffold "Data Source=tcp:[AZURE-SQL-Server].database.windows.net,1433;
Initial Catalog=eShoppingCodi;User Id=[User-Name];
Password=[Password]"
Microsoft.EntityFrameworkCore.SqlServer -o Models
Listing 2: The Scaffold DbContext command
In the project, the Model folder will be added with the eShoppingCodiContext.cs and Category.cs class files. The eShoppingCodiContext.cs file contains the eShoppingCodiContext class with OnConfiguring() method in it. The Category.cs contains the Category class.
Modify the appsettings.json file by copying the Connection String from the OnConfiguring() method of the eShoppingCodiContext class in the ConnectionStrings section. We also need to add the Primary Connection String discussed in Figure 5 into the appsettings.json file as shown in Listing 3
"ConnectionStrings": {
    "DbConnection": "Data Source=tcp:[AZURE-SQL-DB-SERVER].database.windows.net,1433;Initial Catalog=eShoppingCodi;User Id=[USER-NAME];Password=[PASSWORD]",
    "RedicConnectionString": "[INSTANCE-NAME].redis.cache.windows.net:6380,password=[ACCESS-KEY-HERE]=,ssl=True,abortConnect=False"
  }
Listing 3: Modification to the appsettings.json
Step 4: The most important step here is that now we need to install package to access Redis Cache. Install the following package
StackExchange.Redis
Step 5: Its time for us to register the eShoppingCodeContext and the Dependency Container as well as we need to register the Redis Cache service in the project. Modify the Proram.cs by adding code as shown in Listing 4
builder.Services.AddDbContext<eShoppingCodiContext>(opt =>
{
    opt.UseSqlServer(builder.Configuration.GetConnectionString("DbConnection"));
});
// The Service for Redis Cache

builder.Services.AddStackExchangeRedisCache(option =>
{
    option.Configuration = builder.Configuration.GetConnectionString
        ("RedicConnectionString");
});
Listing 4: The DbContext and Redis Cache Service registration
Step 6: In the Controllers folder, add a new empty API Controller and name it as CategoryController. In this controller we will inject eShoppingCodiContext and IDistributedCache types. The IDistributedCache interface represents the the distributed cache to access the data from Redis Cache. The code of the controller is shown in Listing 5
using System.Text.Json;
using ASPNet_Redis.Models;
using Microsoft.AspNetCore.Mvc;
using Microsoft.Extensions.Caching.Distributed;

namespace ASPNet_Redis.Controllers
{
    [Route("api/[controller]")]
    [ApiController]
    public class CategoryController : ControllerBase
    {
        IDistributedCache redisCache;

        eShoppingCodiContext ctx;

        public CategoryController(eShoppingCodiContext ctx, IDistributedCache redisCache)
        {
            this.ctx = ctx;
            this.redisCache = redisCache;
        }
        [HttpGet]
        public IActionResult Get()
        {
            // chec if the cache with name 'categories' is present
            string categoriesData = redisCache.GetString("categories");
            if (categoriesData == null)
            {
                // if the cache is null then add data in cache

                List<Category> categories = ctx.Categories.ToList();
                // serialize data in JSON Form
                categoriesData = JsonSerializer.Serialize<List<Category>>(categories);
                // save data in cache
                // DistributedCacheEntryOptions: class used to define caching metadata e.g. life span for cache

                var cacheOptions = new DistributedCacheEntryOptions();
                // expiration time from the Cache Time
                cacheOptions.SetAbsoluteExpiration(DateTimeOffset.Now.AddMinutes(1));
                redisCache.SetString("categories", categoriesData, cacheOptions);
                return Ok(new
                {
                    message = "Data Received from Database",
                    data = categories
                });
            }
            else
            {
                // read data from cache and return it
                JsonSerializerOptions options = new JsonSerializerOptions()
                {
                    PropertyNameCaseInsensitive = true
                };
                // deserilized the data from cache
                List<Category>? cats = JsonSerializer.Deserialize<List<Category>>(categoriesData, options);
                // return dara from cache
                return Ok(new
                {
                    message = "Data Received from Cache",
                    data = cats
                });
            }

        }
    }
}
Listing 5: The CategoryController code
The Get() method in the controller tries to read data from the cache use the GetString() method. If the cache does not haqve the data, then call to the database is made to read category data from the Azure SQL database. This data is stored in the cache using the SetString() method. This data is stored in JSON form using JSON serialization. The key used to store and read data to and from in cache is categories. The DistributedCacheEntryOptions class is used to define cache options e.g. Expiration time for the data in cache. If the cache contains the data, then it will be deserialized and stored in the List of categories and it will be returned in HTTP response.
Run the API application the Swagger UI will be loaded in the Browser as shown in Figure 6

Figure 6: Swagger
Click on 'Get' button for Category API, the data will be received from the database as shown in Figure 7

Figure 7: Data Received from database
Figure 7 shows thw message as "Data Received from Database". If you see the output window in Visual Studio, the Select query execution will be displayed as shown in Figure 8

Figure 8: The Query Execution
Click on 'Get' button again, now the data will be received from the cache as shown in Figure 9

Figure 9: Data Received from Cache
We can also see the Memory Usage by the Cache from the Azure Portal as shown in Figure 10

Figure 10: Azure Redis Cache Memory Usage
The code for this article can be downloaded from this link.
Cloclusion: The Distributed Cache is one of the best way to make data available to ASP.NET Core Apps with Hight Performance.


