ASP.NET Core 6: Adding Custom Middleware and Logging the Error Message in Database
In this article, we will implement a custom Error Handler Middleware in ASP.NET Core 6. Middleware in ASP.NET Core Eco-System is a custom object that we integrate into the HTTP Request Response pipeline. This is a replacement for HttpModule and HttpHandler that was provided in ASP.NET and in MVC on .NET Framework. The HttpHandler and HttpModule were provided with IIS on Windows OS. Since the ASP.NET Core Eco-System is supported on Cross-Platform, the HttpHandler and HttpModule are replaced by the Middlewares.
Implementation of the Custom Middleware
The implementation of the custom middleware is done by adding a new class in ASP.NET Core project. This class mus be constructor injected using the RequestDelegate delegate. This delegate is used to build the HTTP pipeline. Every HTTP request is handled by the RequestDelegate. This delegate invokes a method InvokeAsync() that accepts the HttpContext as input parameter. The current HTTP request is represented using the HttpContext class. Once the custom middleware is registered into the pipeline, the InvokeAsync() method will be invoked and it is executed. The figure 1 will provide an idea of an execution of the middleware in ASP.NET Core request Pipeline
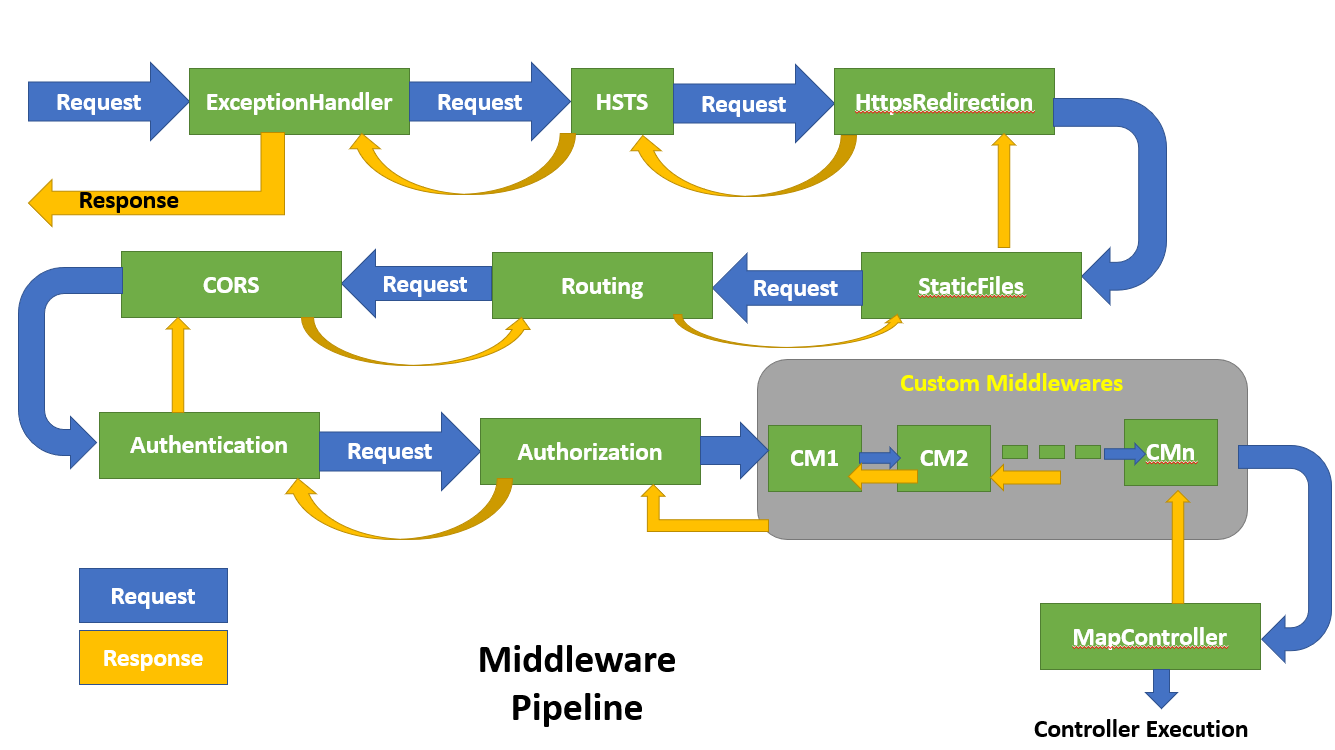
Figure 1: The ASP.NET Core middleware pipeline
The Figure 1 provide fair idea of the Middleware Pipeline. There are several built-in middlewares provided by the ASP.NET Core to hanlde the request. The custom middlewaer is invoked after the authorization. The logic of the custom middleware is executed when a specific condition is matched.
To implement the project discussed in this article, the Visual Studio 2022 and .NET 6 SDK is mandatory. The Visual Studio 2022 can be downloaded from this link. The .NET 6 SDK can be downloaded from this link.
Step 1: Open Visual Stusio 2022 and create a new ASP.NET Core WEB API project targetted to .NET 6. Name this project as Net6_Middlewares. Since, we will be logging error messages in SQL Server, we need to us EntityFramework Core. In this project add follwing packages
- Microsoft.EntityFrameworkCore
- Microsoft.EntityFrameworkCore.SqlServer
- Microsoft.EntityFrameworkCore.Relational
- Microsoft.EntityFrameworkCore.Tools
public class Employee
{
   [Required(ErrorMessage ="EmpNo is Required")]
   public int EmpNo { get; set; } = 0;
   [Required(ErrorMessage = "EmpName is Required")]
   public string EmpName { get; set; } = string.Empty;
}
We will use this class to accept Employee data from the enduser using the Web API. In the Models folder add a new class file and name it as ErrorLogger.cs. In this class file add an ErrorLogger class as shown in listing 2
public class ErrorLogger
{
  [Key]
  public int LoggerId { get; set; }
  [Required]
  public string ErrorDetails { get; set; } = String.Empty;
  public DateTime LogDate { get; set; }= DateTime.Now;
}
Listing 2: The ErrorLogger class
We will use the ErrorLogger class to log Error Messages in the SQL Server database. To generate database from the ErrorLogger class we will be using the EntityFramework Core Code-First approach. To use the Code-First approach, we need the DbContext class and the connectionstring in the application. Modify the appsettings.json file by adding a connsection string in it as shown in listing 3
"ConnectionStrings": {
    "LoggerConn": "Data Source=.;Initial Catalog=LoggerDb;Integrated Security=SSPI"
}
Listing 3: The databse connection string
In the Models folder add a new class file and name it as LoggerDbContext.cs. In this file add a code to define DbContext class and DbSet property in it so that LoggerDb database and ErrorLogger table in this database is created. The code of the LoggerDbContext is provided in listing 4
public class LoggerDbContext : DbContext
{
  public DbSet<ErrorLogger> ErrorLogger { get; set; }
  public LoggerDbContext(DbContextOptions<LoggerDbContext> dbContext) :base(dbContext)
  {
  }
  protected override void OnModelCreating(ModelBuilder modelBuilder)
  {
    base.OnModelCreating(modelBuilder);
  }
}
Listing 4: The LoggerDbContext class
Step 3: Once we have the Model classes and the DbContext class, its time for us to register it in dependency container of the ASP.NET Core. To register the DbContext class in dependency container, modify the Program.cs file by adding the code shown in listing 5 in it
builder.Services.AddDbContext<LoggerDbContext>(options => {
    options.UseSqlServer(builder.Configuration.GetConnectionString("LoggerConn"));
});
Listing 5: The Dependency registration of DbContext
Step 4: Open the Command Prompt and navigate to the project folder and run the following commands to generate Migrations and the database from the DbContext class to generate a SQL Server database of name LoggerDb and ErrorLogger table in it
dotnet ef migrations add firstMigration -c Net6_Middlewares.Models.LoggerDbContext
dotnet ef database update -c Net6_Middlewares.Models.LoggerDbContext
Step 5: We have the initial setup for the implementation ready. Now, it is time for use to create a custom middleware for the API project. This Custom Middleware will handle exception thrown while executing the HTTP request to API and log error messag in the table. In the project add a new folder and name it as AppMiddlewares. In this folder add a new class file name it as CustomMiddleware.cs. In this class file add code as shwon in listing 6
using Net6_Middlewares.Models;
namespace Net6_Middlewares.AppMiddlewares
{
    public class ErrorInfo
    {
        public int StatusCode { get; set; } = 0;
        public string ErrorMessage { get; set; } = string.Empty;
    }


    public class ErrorHandler
    {
        private readonly RequestDelegate requestDelegate;

        public ErrorHandler(RequestDelegate requestDelegate)
        {
            this.requestDelegate = requestDelegate;

        }

        public async Task InvokeAsync(HttpContext context, LoggerDbContext loggerContext)
        {
            try
            {
                await requestDelegate(context);
            }
            catch (Exception ex)
            {
                context.Response.StatusCode = 500;

                var errorInfo = new ErrorInfo()
                {
                    StatusCode = context.Response.StatusCode,
                    ErrorMessage = ex.Message
                };

                var errorLog = new ErrorLogger()
                {
                  ErrorDetails = errorInfo.ErrorMessage,
                  LogDate = DateTime.Now
                };
                await loggerContext.ErrorLogger.AddAsync(errorLog);
                await loggerContext.SaveChangesAsync();

                await context.Response.WriteAsJsonAsync<ErrorInfo>(errorInfo);
            }
        }
    }


    public static class MiddlewareRegistrationExtension
    {
        public static void UseAppException(this IApplicationBuilder builder)
        {
            builder.UseMiddleware<ErrorHandler>();
        }
    }
}
Listing 6: The Custom Middleware Logic
The code in Listing 6, has the following specifications
- The ErroInfo class, defines properties like StatusCode and ErrorMessage, these propeties are used to define Error Code and the Error Message throwsn by the API action method while execuion.
- The ErroHandler class is constructor injected using RequestDelegate. As explained in the beginning of this article, the RequestDelegate will be used to handle the HTTP request and execute the middleware by invoking an IncokeAsync() method. The InvokeAsync() method accepts HttpContext and the LoggerDbContext objects as input parameters. The HttpContext represents the current HTTP request and the LoggerDbContext object is passed to this method so that, error information is logged in the database. The InvokeAsync() method contains try...catch.. block. If there is no execption thrown while executing the HTTP request then the HTTP pipeline will continue execution and successful response will be generated. If any exception is thrown while executing the HTTP request then the catch block will be executed and StatusCode and Error message of the ErroInfo class will be set. The ErrorInfo class instance will be responded using the WriteAsJsonAsync<T> method of the Response property of the HttpContext class. The error information will also be logged in the database using the loggerContext parameter of the type LoggerDbContext.
- The MiddlewareRegistrationExtension class will be used to register the ErrorHandler class as a custom middleware in the HTTP pipeline using the UseMiddleware<T>() extension method of the IApplicationBuilder inside the UseAppException() method.
using Microsoft.AspNetCore.Mvc;
using Net6_Middlewares.Models;
namespace Net6_Middlewares.Controllers
{
    [Route("api/[controller]")]
    [ApiController]
    public class EmployeeController : ControllerBase
    {
        List<Employee> Employees;

        public EmployeeController()
        {
            Employees = new List<Employee>();
        }

        [HttpPost]
        public IActionResult Post(Employee employee)
        {
            if (ModelState.IsValid)
            {
                if (employee.EmpNo < 0) throw new Exception("EmpNo cannot be -ve");
                Employees.Add(employee);
                return Ok(Employees);
            }
            else
            {
                return BadRequest(ModelState);
            }
        }

    }
}

Figure 2: Testing the Post method


