Blazor WebAssembly: Performing the Table Pagination on Server-Side and Client-Side
Blazor is an interactive UI technology for modern Web Front-End apps, there are various kinds of UI and UX needs from the end-users. One such need is the Pagination of data that is shown in table form on the UI. In this article, we will implement Server-Side pagination using ASP.NET Core API defined using .NET 6 by using UI client as Blazor WebAssembly Application. The Blazor WebAssembly application executes in Browser. This is pure front-end application technology. In this article, we will implement an End-to-End .NET Full-Stack application and we will see a simple implementation of the Server-Side Pagination for fetching data from the Azure SQL database server and displaying it in Blazor Component that contains HTML Table.
This article has 2 phases in the first phase, we will see how to perform pagination on the in-memory collection that is already loaded in the browser, and in the second phase, we will see how the server-side pagination can be implemented by receiving data from Azure SQL database and API. Figure 1 will put light on the implementation
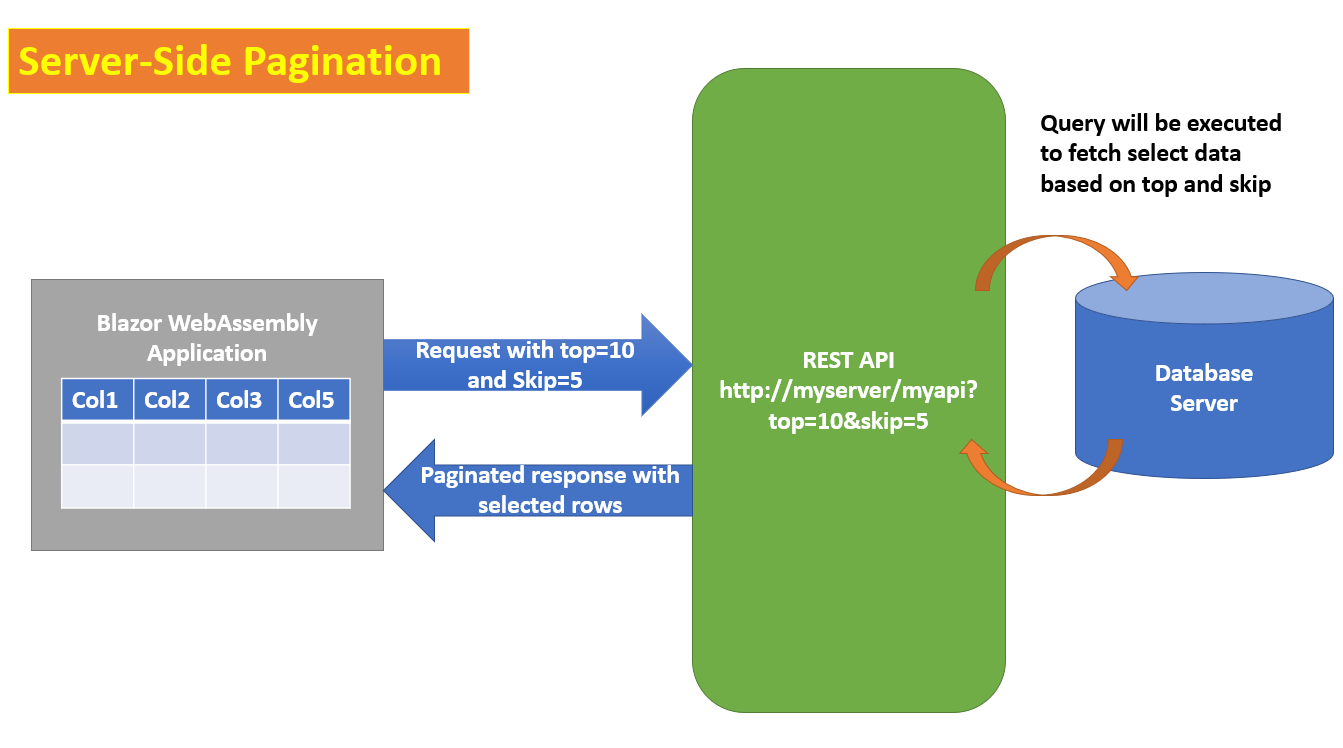
Figure 1: The Server-Side Pagination
This code of this article is implemented using Microsoft Visual Studio 2022 and .NET 6. The .NET 6 can be downloaded from this link.
Phase 1: The Client-Side Pagination based in the In-Memory Collection loaded
Step 1: Open VS2022 and create a new Blazor WebAssembly project. Name this project as Balz_Pagination. In this project add a new folder, name this folder as Models. In this folder add a new class file and name it as StatesCities.cs. In this file add the State and City classes as shown in listing 1
namespace Blaz_CascadeDropdown.Models
{
    public class State
    {
        public int StateId { get; set; }
        public string? StateName { get; set; }
    }

    public class States : List<State>
    {
        public States()
        {
            Add(new State() { StateId = 1, StateName = "Andhra Pradesh" });
            Add(new State() { StateId = 2, StateName = "Arunachal Pradesh" });
            Add(new State() { StateId = 3, StateName = "Assam" });
            Add(new State() { StateId = 4, StateName = "Bihar" });
            Add(new State() { StateId = 5, StateName = "Chhattisgarh" });
            Add(new State() { StateId = 6, StateName = "Goa" });
            Add(new State() { StateId = 7, StateName = "Gujarat" });
            Add(new State() { StateId = 8, StateName = "Haryana" });
            Add(new State() { StateId = 9, StateName = "Himachal Pradesh" });
            Add(new State() { StateId = 10, StateName = "Jharkhand" });
            Add(new State() { StateId = 11, StateName = "Karnataka" });
            Add(new State() { StateId = 12, StateName = "Kerala" });
            Add(new State() { StateId = 13, StateName = "Maharashtra" });
        }
    }


    public class City
    {
        public int CityId { get; set; }
        public string? CityName { get; set; }
        public int StateId { get; set; }
    }

    public class Cities : List<City>
    {
        public Cities()
        {
            Add(new City() { CityId = 101, CityName = "Vizianagaram", StateId = 1 });
            Add(new City() { CityId = 102, CityName = "Prakasam", StateId = 1 });
            Add(new City() { CityId = 103, CityName = "West Godavari", StateId = 1 });
            Add(new City() { CityId = 104, CityName = "Kurnool", StateId = 1 });


            Add(new City() { CityId = 201, CityName = "Tawang", StateId = 2 });
            Add(new City() { CityId = 202, CityName = "Itanagar", StateId = 2 });
            Add(new City() { CityId = 203, CityName = "Naharlagun", StateId = 2 });
            Add(new City() { CityId = 204, CityName = "Along", StateId = 2 });

            Add(new City() { CityId = 301, CityName = "Baksa", StateId = 3 });
            Add(new City() { CityId = 302, CityName = "Jorhat", StateId = 3 });
            Add(new City() { CityId = 303, CityName = "Sivasagar", StateId = 3 });
            Add(new City() { CityId = 304, CityName = "Barpeta", StateId = 3 });


            Add(new City() { CityId = 401, CityName = "Araria", StateId = 4 });
            Add(new City() { CityId = 402, CityName = "Aurangabad", StateId = 4 });
            Add(new City() { CityId = 403, CityName = "Begusarai", StateId = 4 });
            Add(new City() { CityId = 404, CityName = "Patna", StateId = 4 });

            Add(new City() { CityId = 501, CityName = "Balod", StateId = 5 });
            Add(new City() { CityId = 502, CityName = "Baloda Bazar", StateId = 5 });
            Add(new City() { CityId = 503, CityName = "Balrampur", StateId = 5 });
            Add(new City() { CityId = 504, CityName = "Bastar", StateId = 5 });

            Add(new City() { CityId = 601, CityName = "North Goa", StateId = 6 });
            Add(new City() { CityId = 602, CityName = "South Goa", StateId = 6 });

            Add(new City() { CityId = 701, CityName = "Ahmedabad", StateId = 7 });
            Add(new City() { CityId = 702, CityName = "Amreli", StateId = 7 });
            Add(new City() { CityId = 703, CityName = "Baroda", StateId = 7 });
            Add(new City() { CityId = 704, CityName = "Surat", StateId = 7 });

            Add(new City() { CityId = 801, CityName = "Ambala", StateId = 8 });
            Add(new City() { CityId = 802, CityName = "Bhiwani", StateId = 8 });
            Add(new City() { CityId = 803, CityName = "Charkhi Dadri", StateId = 8 });
            Add(new City() { CityId = 804, CityName = "Fatehabad", StateId = 8 });

            Add(new City() { CityId = 901, CityName = "Bilaspur", StateId = 9 });
            Add(new City() { CityId = 902, CityName = "Chamba", StateId = 9 });
            Add(new City() { CityId = 903, CityName = "Kangra", StateId = 9 });
            Add(new City() { CityId = 904, CityName = "Kullu", StateId = 9 });

            Add(new City() { CityId = 1001, CityName = "Bokaro", StateId = 10 });
            Add(new City() { CityId = 1002, CityName = "Chatra", StateId = 10 });
            Add(new City() { CityId = 1003, CityName = "Deoghar", StateId = 10 });
            Add(new City() { CityId = 1004, CityName = "Dhanbad", StateId = 10 });

            Add(new City() { CityId = 1101, CityName = "Bagalkot", StateId = 11 });
            Add(new City() { CityId = 1102, CityName = "Ballari ", StateId = 11 });
            Add(new City() { CityId = 1103, CityName = "Bengaluru ", StateId = 11 });
            Add(new City() { CityId = 1104, CityName = "Bidar", StateId = 11 });


            Add(new City() { CityId = 1201, CityName = "Kannur", StateId = 12 });
            Add(new City() { CityId = 1202, CityName = "Kollam ", StateId = 12 });
            Add(new City() { CityId = 1203, CityName = "Kottayam ", StateId = 12 });
            Add(new City() { CityId = 1204, CityName = "Palakkad", StateId = 12 });

            Add(new City() { CityId = 1301, CityName = "Pune", StateId = 13 });
            Add(new City() { CityId = 1302, CityName = "Thane ", StateId = 13 });
            Add(new City() { CityId = 1303, CityName = "Nashik ", StateId = 13 });
            Add(new City() { CityId = 1304, CityName = "Kolhapur", StateId = 13 });

        }
    }
}
Listing 1: State and City classes
The Cities classes in Listing 1, will be used for showing data in the HTML table.
Step 2: In the Models folder, add a new class file and name it Pagination.cs. This class file contains two classes. These classes will be used to contain logic for calculating the Pages Count and the Link text showing pages links. The code for these classes is shown in Listing 2
namespace Blaz_CascadeDropdown.Models
{
    public class Pagination
    {
        public int CurrentPage { get; set; } = 1;
        public int PageCount(int recCount, int recPerPage)
        {
            return Convert.ToInt32(Math.Ceiling(recCount / (double)recPerPage));
        }
    }

    public class Paging
    {
        public string LinkText { get; set; }
        public int PageId { get; set; }

        public Paging(int page, string text)
        {
            PageId = page;
            LinkText = text;
        }
    }
}
Listing 2: The Pagination classes
The Pagination class contains PageCount() method. This method accepts the total Records Count (recCount) and Records Per Page (recPerPage) as input parameters and calculates the number of page count to be generated for the pagination. The class Paging is used to define metadata for the paging links generated i.e. the PageId and the Linktext.
Step 3: In the Pages folder add a new Razor Component. Name this component as TablePagination.razor. This component uses the Cities, Pagination classes to show data in the HTML table and execute the pagination. In this component add the code as shown in Listing 3
@page "/pagination"
@using Blaz_CascadeDropdown.Models;
<h3>Table Pagination</h3>

<div class="container">
    <EditForm Model="@city">
        <div class="form-group">
            <label>Select Number of Records To View Per Page</label>
            <InputSelect class="form-control"
            ValueExpression="@(()=>recordsPerPage)"
                Value="@recordsPerPage"
                 ValueChanged="@((int pg)=>changePages(pg))">
               @foreach (var item in records)
               {
                 <option value="@item">@item</option>
               }
            </InputSelect>
        </div>
   <div class="container" style="height:500px;overflow:auto">
     <table class="table table-bordered table-striped table-dark">
        <thead>
            <tr>
                <td>
                    City Id
                </td>
                <td>
                    City Name
                </td>
                <td>
                    State Id
                </td>
            </tr>
        </thead>
        <tbody>
           @foreach (var city in FilteredCities)
            {
                <tr>
                    <td>@city.CityId</td>
                    <td>@city.CityName</td>
                    <td>@city.StateId</td>
                </tr>
            }
        </tbody>
    </table>
    </div>
   </EditForm>

    <br/>
    <nav aria-label="navigation">
        <ul class="pagination justify-content-center">
             @foreach(var pageInfo in paging)
             {
               <li class="page-item c@pgIndex"
                  @onclick="@(()=>selectPage(pageInfo.LinkText))"
                  ><a class="page-link" href="/pagination"
                  >@pageInfo.PageId</a></li>
             }
        </ul>
    </nav>
</div>
@code {
    private Cities? cities;
    private City? city;
    private int[]records  = new int[]{1,5,10,15,20,25,30,35,40};
    private int recordsPerPage = 0;
    private int pages = 0;
    private int index = 0;
    private Pagination? pagination;
    private List<Paging>? paging;
    private List<City>? FilteredCities;
    int recs = 0;
    protected override void OnInitialized()
    {
        cities = new Cities();
        city = new City();
        pagination = new Pagination();
        paging = new List<Paging>();
        FilteredCities = new Cities();
        FilteredCities = cities;
        base.OnInitialized();
    }

    void changedPages(int pg)
    {
        paging = new List<Paging>();
        recordsPerPage = pg;
        // select the number of pages to be displayed
        if (cities?.Count >= recordsPerPage)
        {
            pages = pagination.PageCount(cities.Count, recordsPerPage);
        }
        // Generate Pagination
        for (int i = 0; i <= pages; i++)
        {
            paging.Add(new Paging(i,i.ToString()));
        }
        // Filter records based on the selected recordPerPage
        FilteredCities = cities.Take(recordsPerPage)
                           .ToList<City>();
    }
    // Start Pagination
    void selectPage(string pg)
    {
        recs = recordsPerPage * int.Parse(pg);
        FilteredCities = cities.Skip(recs).Take(recordsPerPage)
                           .ToList<City>();
        // reset the record count
        recs = 0;
    }
}
Listing 3: The Client-Side Pagination
The component in Listing 3 dynamically generates the HTML table based on the FilteredCities List object. This object is assigned using the Cities List object. The records array declared in the component is used to generate HTML select element using InputSelect standard Blazor component which will be used to show the number of records to be displayed in the table. The InputSelect element is subscribed with the ValueChanged event and it is bound with the changePages() method. This method accepts the selected value from the InputSelect element which is used for displaying the number of records in the HTML table. This method further calculates the total number of pages to be displayed using the PageCount() method of the class. The changePages() method further uses the page count to generate pagination links using the paging list. This list uses the Paging class to store the PageId and LinkText for showing the pagination links. The paging list is used to generate page navigation links using the navigation and pagination classes of Bootstrap CSS Framework. The changesPages() method further uses the LINQ to filter records from the cities list and store it in the FilteredCities list. This will show the zeroth (0th) page in the HTML table. When the page link is clicked, the selectPage() method will be invoked. This method will accept the LinkText of the pagination link that is clicked (aka page number to navigate to), based on the page number clicked from the page link, the LINQ query will be executed which will decide how many records to be skipped from the cities list and how many records are read so that they can be displayed in the HTML table.
Step 4: Modify the NavMenu.razor file from the Shared folder to display the navigation link for the TablePagination component as shown in Listing 4
  <div class="nav-item px-3">
     <NavLink class="nav-link" href="pagination">
        <span class="oi oi-list-rich" aria-hidden="true"></span>
        Table Pagination
     </NavLink>
    </div>
Listing 4: The NavMenu.razor modification
Run the application, the browser will show the application with the navigation link to the Table Pagination component. Click on the link, the Table Pagination will be loaded as shown in Figure 2

Figure 2: The Pagination Component
The table shows all data from the Cities list. From the Select element (dropdown), select the number of records to view per page, e.g. if you select the number of records as 5, the HTML table will show 5 records and the pagination links will be generated as shown in Figure 3

Figure 3: Navigation links generated based on the number of records per page is selected
Click on pagination links, the HTML table will show data for the selected page. This is how we can build a simple logic to implement pagination on the client-side in the Blazor WebAssembly application. As we know that the Blazor WebAssembly loads the application in the browser we have all data on the client-side. I have already posted an article on Blazor WebAssembly State Management on this link. But, what if we do not want to load the whole data on the client-side and instead we want to fetch data from the remote database server? This is where we need to think of implementing the Pagination on the server-side using the REST API.
Phase 2: The Server-Side Pagination Using REST API
In this phase, we will implement the ASP.NET Core 6 REST API. This API will contain HTTP GET method that will accept top and skip parameters to implement pagination on the server-side. The API uses EntityFramework Core (EF Core) to read data from the AZURE SQL database (You can use the local database). The EF Core uses the database first approach to generate Models from the database table. (Note: I have skipped steps of creating an API project and using EF Core. If you want to understand the use of EF Core with the .NET core application then visit this link.) The HTTP GET methods code in API is shown in the Listing 5
using APIService.Models;
using Microsoft.AspNetCore.Mvc;
namespace APIService.Controllers
{
    [Route("api/[controller]")]
    [ApiController]
    public class DBApiController : ControllerBase
    {
        ProductCatalogContext productCatalogContext;

        public DBApiController(ProductCatalogContext ctx)
        {
            productCatalogContext = ctx;
        }
        [HttpGet("{top}/{skip}")]
        public async  Task<IActionResult> Get(int? top = 0, int? skip=0)
        {
            List<Product> products = new List<Product>();
            if (top == 0 && skip == 0)
            {
                products = productCatalogContext.Products.ToList();
            }

            if (top > 0 && skip == 0)
            {
                products = productCatalogContext.Products
                                         .Take(Convert.ToInt32(top))
                           .ToList<Product>();
            }
            if(top >0  && skip > 0 )
            {
                products = productCatalogContext.Products
                                         .Skip(Convert.ToInt32(skip))
                                         .Take(Convert.ToInt32(top))
                           .ToList<Product>();
            }

           return Ok(products);
        }
    }
}
Listing 5: The API method for Pagination
The API is injected with the ProductCatalogContext class. This class is generated using the EF Core database first approach. The Get() method accepts top and skip parameters to perform pagination.
Step 5: In the Models folder of the Blaze_Pagination project add a new class file and name it as Product.js. In this file add the Product class code as shown in Listing 6
namespace Blaz_CascadeDropdown.Models
{
    public class Product
    {
        public int ProductRowId { get; set; }
        public string ProductId { get; set; } = null!;
        public string ProductName { get; set; } = null!;
        public string CategoryName { get; set; } = null!;
        public string Manufacturer { get; set; } = null!;
        public string Description { get; set; } = null!;
        public int BasePrice { get; set; }
    }
}
Listing 6: The Product class
This class will be used to show Products data in the HTML table.
Step 6: In the Models folder add a new class file and name it as ClientService.cs. In this class file we will add ClientService class. This class will contain a method to make an HTTP call to the API. Add the class code as shown in listing 7
using System.Net.Http.Json;
namespace Blaz_CascadeDropdown.Models
{
    public class ClientService
    {
        private HttpClient _httpClient;
        public ClientService()
        {
            _httpClient = new HttpClient();
        }

        public async Task<List<Product>> GetAsync(int? take,int? skip)
        {
            try
            {
                var result = await _httpClient.GetFromJsonAsync<List<Product>>
                ($"http://localhost:5187/api/DBApi/{take}/{skip}");
                return result;
            }
            catch (Exception ex)
            {
                throw ex;
            }
        }
    }
}
Listing 7: The ClientService class
The GetAsync() method in the ClientService class accepts take and skip parameters and using the HttpClient class, the call to API is made to fetch the data based on the values of top and skip parameters. Default values for these parameters are 0. If the take and skip parameter values are 0 then all records will be fetched otherwise data will be fetched based on the values of the take and skip parameters.
Step 7: To register the ClientService class in the DI container, modify the Program.cs file as shown in the code of listing 8
...........
builder.Services.AddScoped <ClientService>();
...........
Listing 8: Registering the Client Service class in the DI Container
Step 8: In the Pages folder, add a new Razor component and name it as TablePaginationServer.razor. This component will also use the Paging and Pagination classes as explained in Phase 1. Add the UI and code for this component as shown in the lisitng 9
@page "/serverpagination"
@using Blaz_CascadeDropdown.Models;
@inject Blaz_CascadeDropdown.Models.ClientService Client;
<h3>Server-Side Table Pagination</h3>

<div class="container">
    <EditForm Model="@product">
        <div class="form-group">
            <label>Select Number of Records To View Per Page</label>
            <InputSelect class="form-control" ValueExpression="@(()=>recordsPerPage)"
                Value="@recordsPerPage"
                 ValueChanged="@((int pg)=>changePages(pg))">
               @foreach (var item in records)
               {
                 <option value="@item">@item</option>
               }
            </InputSelect>
        </div>
   <div class="container" style="height:500px;overflow:auto">
     <table class="table table-bordered table-striped table-dark">
        <thead>
            <tr>
                <td>
                    Product Row Id
                </td>
                <td>
                    Product Id
                </td>
                <td>
                    Product Name
                </td>
                <td>
                    Category Name
                </td>
                <td>
                    Manufacturer
                </td>
                <td>
                    Description
                </td>
                <td>
                    Base Price
                </td>
            </tr>
        </thead>
        <tbody>
           @foreach (var prd in FilteredProducts)
            {
                <tr>
                    <td>@prd.ProductRowId</td>
                    <td>@prd.ProductId</td>
                    <td>@prd.ProductName</td>
                    <td>@prd.CategoryName</td>
                    <td>@prd.Manufacturer</td>
                    <td>@prd.Description</td>
                    <td>@prd.BasePrice</td>
                </tr>
            }
        </tbody>
    </table>
    </div>
   </EditForm>

    <br/>
    <nav aria-label="navigation">
        <ul class="pagination justify-content-center">
             @foreach(var pageInfo in paging)
             {
               <li class="page-item c@pgIndex"
                  @onclick="@(()=>selectPage(pageInfo.LinkText))">
                  <a class="page-link" href="/serverpagination"
                  >@pageInfo.PageId</a></li>
             }
        </ul>
    </nav>
    <hr/>
    <div class="container">
        @ErrorMessage
    </div>
</div>
@code {
    private List<Product>? Products;
    private Product? product;
    private int[]records  = new int[]{1,5,10,15,20,25,30,35,40};
    private int recordsPerPage = 0;
    private int pages = 0;
    private int index = 0;
    private Pagination? pagination;
    private List<Paging>? paging;
    private List<Product>? FilteredProducts;
    int recs = 0;
    private string ErrorMessage = string.Empty;

    protected override async Task OnInitializedAsync()
    {
        Products = new List<Product>();
        product = new Product();
        paging = new List<Paging>();
        FilteredProducts = new List<Product>();
        pagination = new Pagination();
        Products = await Client.GetAsync(0, 0);

        FilteredProducts = Products;

        // return base.OnInitializedAsync();
    }

    async Task changePages(int pg)
    {
        try
        {
            paging = new List<Paging>();
            recordsPerPage = pg;
            pages = pagination.PageCount(Products.Count, recordsPerPage);

            // Generate Pagination
            for (int i = 0; i <= pages; i++)
            {
                paging.Add(new Paging(i, i.ToString()));
            }

            // Filter records based on the selected recordPerPage
            FilteredProducts = await Client.GetAsync(recordsPerPage, 0);
        }
        catch (Exception ex)
        {
            ErrorMessage = ex.Message;
        }


    }
    // Start Pagination
    async Task selectPage(string pg)
    {
        try
        {
            recs = recordsPerPage * int.Parse(pg);
            FilteredProducts = await Client.GetAsync(recordsPerPage, recs);
            recs = 0;
         }
        catch (Exception ex)
        {
            ErrorMessage = ex.Message;
        }
    }
}
Listing 9: The TablePaginationServer.razor
As shown in Listing 9, the component is injected with the ClientService class. As explained in TablePagination.razor component in Phase 1, the InputSelect is populated using the records array, and the changesPages() method is bound with the ValueChanged event of the InputSelect. This method will call the GetAsync() method of the ClientService class to show records in the HTML table based on the selected value from the InputSelect element for showing the number of records in the HTML table. This method will also generate pagination links. When the page number is selected from the pagination link, the selectPage() method will be executed. This method will calculate the records to be skipped for the pagination and the recordsPerPage and records to be skipped will be passed to the GetAsync() method to fetch records from the server. This is how simple server-side pagination can be implemented.
Step 9: Modify the NavMenu.razor file from the Shared folder and add the navigation link for the TablePaginationServer component as shown in listing 10
 <div class="nav-item px-3">
            <NavLink class="nav-link" href="serverpagination">
                <span class="oi oi-list-rich" aria-hidden="true"></span>
Server-Side Table Pagination
            </NavLink>
        </div>
Listing 10: The Navigation link for the Table Pagination Server component
Run the API project and then the Blazor WebAssembly application. Once the Blazor application is loaded in the browser, click on the Server-Side Table Pagination link. This will show all products loaded in the browser as shown in figure 4

Figure 4: Loading all products
Select the number of records to view per page from the dropdown, the HTML table will show those many records and the Pagination links will be generated as shown in figure 5

Figure 6: The Server-Side pagination
The code for this article can be downloaded from this link.
Conclusion: When Interactive UI Web applications want to fetch and show a large amount of data on the browser, it is highly recommended that the pagination must be implemented for managing the amount of data to be fetched from the server and shown on the browser.